This is likely to be a photo-less post. Sorry, 'mere' words ;-)
I had a sewing machine lesson today. Earlier this month I bought myself a new toy (http://suebk.blogspot.com.au/2013/04/new-toy.html). I've dreamt about owning a machine like this for years and years. Finally, due to my redundancy, I could afford my dream machine. I was so excited about the neat and nifty things it could do. I've shown a couple of non-sewer friends, who have made modest attempts at enthusiasm, but they don't really 'get it'. Friends who sew - they get it.
As part of the cost I get a minimum of two free lessons in driving the machine. It's not really hard to drive a sewing machine. Like most things in life - read the manual, test in a safe environment, push the buttons, see what happens.
When I arrived for my lesson the 'teacher' asked what I had played with. I haven't yet broken any needles (I usually do that running over pins or forgetting to change presser feet). I have jammed the thread, which means I have also pulled apart the bobbin compartment to clean it. I've sewn ordinary stitches, buttonholes, some of the fancy stitches and played around the lettering. I've discovered the needle down, the tie off features, mirroring.
She was a little surprised. Apparently, some people buy a new machine and basically just look at it until they've had a lesson. What the? Some people don't read the manual so they 'break' it or get very confused very quickly. Also, people upgrading from a pure mechanical machine to a whiz-bang computerised machine often use the new machine as though it couldn't do anything fancy.
I did pick up a few tips that I had discovered by myself. I'm now more confident that I know what I'm doing (most of the time).
I explained to my teacher that I had waited a very long time for this machine. I had visited machine stands at every show I went to. I actually discovered some quotes I got several years ago for a couple of different machines. Why, why would I buy it and then not try all the goodies on it?
I wonder how many times we approach life with a similar mentality? We long for and dream of a better 'something' - job, relationship, finances, travel, opportunities - whatever. Eventually it comes along, but instead of embracing it with both hands and exploring all the possibilities we hang back, we worry about 'breaking' it.
The opportunity to travel comes along and we murmur about it being unsafe, and the food's not likely to agree with us, and hotel beds are uncomfortable. Or we go and whinge about everything that's not the same as it is at home.
A wonderful new job comes along and we edge into it timidly. We half expect to 'found out'. That someone is going to 'call us out', because we don't feel we deserve it. We don't take risk, don't embrace the challenges with gusto - just in case.
I am applying for a position in Cairns, which (if I got it) would mean moving the family some 1,700km. Completely different climate (yay), different culture, small city, new jobs, new schools, new house, packing (not so yay). If I don't get the position, I will be focusing on building my freelance business. My hope is that regardless of which path we follow, I will embrace all that life has to offer. I will push all the buttons, play with all the settings, and maybe (just maybe) produce some really creative at the end of the day.
24 April 2013
22 April 2013
Parting is such sweet sorrow
I cut off a limb on the weekend. Well, not literally, but it was almost as painful. Actually, the contemplation was almost as painful, but the reality was quite releasing.
We cleaned out our bookshelves. I love books. I love reading good books filled with real characters, whether they're fictional or not; believable plots, whether they could happen in reality or not; and delicious words. I'm not much of a writer, but I love reading. I also love books that inspire, that inform, that broaden your horizons.
My husband likes the concept of books. He rarely reads non-fiction and he talks about reading more than he actually does it.
My girl has inherited my love of a well-told story.
This is our front entrance bookcase:

What you can't see here is the bottom row of books; the shelf of gardening books to the right; the two cases in the dining room or the case at the end of the hall. What you can probably see is that we had more books than shelves.
When we moved from Perth, ten years ago, we carted most of these books across the country. Boxes and boxes and boxes of them. And since then the vast majority of them have only been touched when the shelves have been moved.
Since we're considering moving again, I figured it was a good time to cull. And cull we did. Our process was very simple. All three of us were involved in a conveyor line process. There were no recriminations or discussion about what people wanted to keep. If an individual wanted to keep something, it got kept.
I cleaned out a shelf and took a book. If I wanted it, it went back on the empty shelf. If I didn't want it, it went down the line to hubby. If he wanted it, back it went; if not, it went to the Girl. If she didn't want it, it went on the pile to give away.
We have tried this once before; a shelf at a time. See that empty shelf at the back, towards the bottom? That's as far as we got. Give hubby enough time and he can talk himself into keeping anything. This turned out to be one of those rare cases where 15 minutes at time wasn't the best method. In an hour and a half we had gone through all the books in the entrance and the case in the hallway. (The dining room books are all my craft book and that is whole other issue!)
The end result:
Now comes the fun part - getting the piles out of the house and resorting the remainder.
As I said at the beginning, I expected it be a painful process. But because I knew I could keep anything I wanted I found it quite freeing and releasing. And I'm not even tempted to 'just check' the piles.
We cleaned out our bookshelves. I love books. I love reading good books filled with real characters, whether they're fictional or not; believable plots, whether they could happen in reality or not; and delicious words. I'm not much of a writer, but I love reading. I also love books that inspire, that inform, that broaden your horizons.
My husband likes the concept of books. He rarely reads non-fiction and he talks about reading more than he actually does it.
My girl has inherited my love of a well-told story.
This is our front entrance bookcase:

What you can't see here is the bottom row of books; the shelf of gardening books to the right; the two cases in the dining room or the case at the end of the hall. What you can probably see is that we had more books than shelves.
When we moved from Perth, ten years ago, we carted most of these books across the country. Boxes and boxes and boxes of them. And since then the vast majority of them have only been touched when the shelves have been moved.
Since we're considering moving again, I figured it was a good time to cull. And cull we did. Our process was very simple. All three of us were involved in a conveyor line process. There were no recriminations or discussion about what people wanted to keep. If an individual wanted to keep something, it got kept.
I cleaned out a shelf and took a book. If I wanted it, it went back on the empty shelf. If I didn't want it, it went down the line to hubby. If he wanted it, back it went; if not, it went to the Girl. If she didn't want it, it went on the pile to give away.
We have tried this once before; a shelf at a time. See that empty shelf at the back, towards the bottom? That's as far as we got. Give hubby enough time and he can talk himself into keeping anything. This turned out to be one of those rare cases where 15 minutes at time wasn't the best method. In an hour and a half we had gone through all the books in the entrance and the case in the hallway. (The dining room books are all my craft book and that is whole other issue!)
The end result:
 |
| Look at all those empty shelves. |
 |
| This case was perhaps the worst for books pushed in just so they would fit. Now look at all that space! In fact, we may be able to consolidate all of these out to the entrance shelves. |
 |
| See the tallest stack? There's another stack behind that one. |
As I said at the beginning, I expected it be a painful process. But because I knew I could keep anything I wanted I found it quite freeing and releasing. And I'm not even tempted to 'just check' the piles.
21 April 2013
Knitting roll
I am not a prolific or able knitter; however, as a chill descends of an evening I pull out the projects. Over the years I have collected a goodly quantity of knitting needles. They've started to become a nuisance; tangling with my yarn, falling out of my box. Last night I hunted the web for instructions to make a needle roll.
I found this one: http://organizedeveryday.blogspot.com.au/2008/07/make-your-own-organizer-tutorial.html. She uses two placemats, layered in such a way so as to give you three horizontal pockets of different depths.
I used the concept as a base, but used fabric instead of placements.
1. I don't have any suitable placemats.
2. I didn't think it would end up big enough for my collection.
I didn't consider: placemats are double sided; placemats are edged. The easiest way to do this would be to bag-quilt two pieces of fabric the size you want and then follow the instructions on Jena's website.
(Bag-quilt - place two pieces of fabric right-sides together; sew around all four sides, leaving an opening big enough to turn right way out. Top-stitch and/or quilt, closing the opening as you do so (or slip stitch it closed if you're pedantic like that).
BUT, I didn't think of that, until I started sewing. So, here's how I ended up doing it.
Three pieces of fabric:
A - 23 x 16 inches. This will form the outside and the lower pocket. Hem one end; interface from the unhemmed end to four inches from the hemmed end. Interface gives it a bit of substances, but you don't want it too sturdy if you plan on rolling it closed.
B - 23 x 16 inches. This will form the lower inside and pockets. Hem one end. Fold the hemmed end up 7 inches (the lower section, folded back in the photo). Fold the unhemmed end down far enough that it is under the hemmed end; zig zag to secure it.
C - 9 x 16 inches. This will form the upper inside flap. If I'd planned ahead, A and C could have been one piece (32 x 16 inches). But I didn't, so I fudged it. (Brown/green hand-dyed fabric in photos.)
To recap so far:
Piece A is hemmed and interfaced. Piece B is hemmed and folded.
Sew Piece C to A on the unhemmed edge.
Place Piece B four inches from the bottom of Piece A
Fold the lower 4 inches of Piece A over the top of Piece B.
You now have three pockets taking shape:
Now, comes the tricky bit (which I stuffed up and had to unpick) - how to layer these to sew them together with the seams on the inside. You could avoid that if you want to by choosing to simply bind the edges at this stage. I considered it, but I'm a lousy binder.
 So, ignoring the placement of Piece C in the above photo, because it's wrong, this is the layering you want happening:
Now - I'm trying to remember if that's right; and my photos aren't really very clear, so I'm not 100% convinced. My suggestion - pin or baste one side. Turn it right side out and check the layers end up in the right place.
 Again, in the photo above, ignore Piece C - it should be UNDER Piece B. I've pinned back the bottom fold of Piece B so you can see what's happening with it and the folded edge of Piece A.
Sew the two long sides. Turn the whole thing in the right way. Some pockets need to be turned twice. (The lowest pocket will initially be on the outside of the roll.)

With the pockets all turned to the inside, top stitch all the way around.
Run a line of stitching across Piece C, four inches from the top - this is your fold over flap.
Sew channels from the top to the bottom. I folded in half, then half again, and half again to end up with 8 channels.
Sew a ribbon just above the middle pocket on one side (right hand side if you're right handed; left if you're left handed).
Fill with knitting goodies, fold down the top, roll and tie to store.

I found this one: http://organizedeveryday.blogspot.com.au/2008/07/make-your-own-organizer-tutorial.html. She uses two placemats, layered in such a way so as to give you three horizontal pockets of different depths.
I used the concept as a base, but used fabric instead of placements.
1. I don't have any suitable placemats.
2. I didn't think it would end up big enough for my collection.
I didn't consider: placemats are double sided; placemats are edged. The easiest way to do this would be to bag-quilt two pieces of fabric the size you want and then follow the instructions on Jena's website.
(Bag-quilt - place two pieces of fabric right-sides together; sew around all four sides, leaving an opening big enough to turn right way out. Top-stitch and/or quilt, closing the opening as you do so (or slip stitch it closed if you're pedantic like that).
BUT, I didn't think of that, until I started sewing. So, here's how I ended up doing it.
Three pieces of fabric:
A - 23 x 16 inches. This will form the outside and the lower pocket. Hem one end; interface from the unhemmed end to four inches from the hemmed end. Interface gives it a bit of substances, but you don't want it too sturdy if you plan on rolling it closed.
 |
| Piece A - hem at bottom; interfacing at top |
 |
| Piece B - Bottom edge hemmed and folded; top edge folded and secured to the back |
 |
| Piece C |
To recap so far:
Piece A is hemmed and interfaced. Piece B is hemmed and folded.
Sew Piece C to A on the unhemmed edge.
Place Piece B four inches from the bottom of Piece A
Fold the lower 4 inches of Piece A over the top of Piece B.
You now have three pockets taking shape:
- a 4 inch pocket between Piece A and B at the bottom
- a 7 inch (only 3 of which is visible) of between the two sides of the folded Piece B in the middle
- a long pocket between Piece B and A at the top.
 |
| Layout of fabrics (inside of roll) |
 | ||
| Layout of fabrics with some tools in the pockets so you can see them |
 |
| This is NOT what you want. When you turn it right-side-out, Piece C (at the top of the picture) should sit BEHIND Piece B. |

- Piece A right side up.
- Piece C folded over, seam visible.
- The lower pocket of Piece A folded up onto the rest of Piece A.
- The pocket of Piece B face down.
Now - I'm trying to remember if that's right; and my photos aren't really very clear, so I'm not 100% convinced. My suggestion - pin or baste one side. Turn it right side out and check the layers end up in the right place.

Sew the two long sides. Turn the whole thing in the right way. Some pockets need to be turned twice. (The lowest pocket will initially be on the outside of the roll.)

With the pockets all turned to the inside, top stitch all the way around.
Run a line of stitching across Piece C, four inches from the top - this is your fold over flap.
Sew channels from the top to the bottom. I folded in half, then half again, and half again to end up with 8 channels.
Sew a ribbon just above the middle pocket on one side (right hand side if you're right handed; left if you're left handed).
Fill with knitting goodies, fold down the top, roll and tie to store.

16 April 2013
Facebook privacy
I'm not an expert at FB, although I really should be given how much I'm on the site.There is so much confusion about the privacy of people's posts, I thought I'd share just a little tid-bit. People post mile long dribble about "hover over my name and click this or that". Rubbish, people, absolute rubbish.
Simply put, for the most part (with some exceptions), you control who sees your posts. Here's how - set all your privacy settings to "FRIENDS ONLY". It's really that simple.
Here's how you know if you've done it right: at the bottom right hand side of the status update box it will say "public", "friends", "only me" or "custom". If your overall privacy settings are set to "Friends" it will say "Friends".
Say I update my status, with privacy set to "friends". Friend #1 comments on it, her friends will see it in their ticker feed IF (and only if) they are also my friends.

The top post is set to public, if I comment on this post everyone and anyone can potentially see my comments - FBUser #10 friends and their friends (including my friends). The bottom post is set to friends only - the only people who will see my posts are FBUser #16's friends - not my friends, but FBUser #16's friends.
You might be looking at your ticker feed and seeing a whole bunch of names you don't know. Usually it goes "Friend commented on Stranger's post". Click that post and you will find that "Stranger's" post was set to public.

In this ticker feed example. I know FBUser #42; I do not know FBUser #41, but note that their posts setting is "Public".
So, the upshot is:
- if you want the world to see your message, use the public setting (and be prepared to wear the consequences, both good and bad)
- if you just want to communicate with YOUR friends, use the friends setting.
At the beginning I said "with some exceptions". If my post is set to "friends", someone is tagged (either by me in the original or by a friend in their comments) my post is now shared with the tagged person's friends.
If I post and tag my husband - all of my friends AND all of his friends can see my post.
If I post and Friend#234 comments and tags their friend #45, all of my friends and all of #45's friends (even though I don't know them) can see my post. So, beware of who is being tagged in your comments!
(Note, my screenshots may not look exactly like yours. I use Social Fixer (https://www.facebook.com/Socialfixer) which is a wonderful browser add-on for removing some of the annoying features of FB.)
Simply put, for the most part (with some exceptions), you control who sees your posts. Here's how - set all your privacy settings to "FRIENDS ONLY". It's really that simple.
Here's how you know if you've done it right: at the bottom right hand side of the status update box it will say "public", "friends", "only me" or "custom". If your overall privacy settings are set to "Friends" it will say "Friends".
 |
| See the tick next to friends? That's what you want! |
Say I update my status, with privacy set to "friends". Friend #1 comments on it, her friends will see it in their ticker feed IF (and only if) they are also my friends.

The top post is set to public, if I comment on this post everyone and anyone can potentially see my comments - FBUser #10 friends and their friends (including my friends). The bottom post is set to friends only - the only people who will see my posts are FBUser #16's friends - not my friends, but FBUser #16's friends.
You might be looking at your ticker feed and seeing a whole bunch of names you don't know. Usually it goes "Friend commented on Stranger's post". Click that post and you will find that "Stranger's" post was set to public.

So, the upshot is:
- if you want the world to see your message, use the public setting (and be prepared to wear the consequences, both good and bad)
- if you just want to communicate with YOUR friends, use the friends setting.
At the beginning I said "with some exceptions". If my post is set to "friends", someone is tagged (either by me in the original or by a friend in their comments) my post is now shared with the tagged person's friends.
If I post and tag my husband - all of my friends AND all of his friends can see my post.
If I post and Friend#234 comments and tags their friend #45, all of my friends and all of #45's friends (even though I don't know them) can see my post. So, beware of who is being tagged in your comments!
(Note, my screenshots may not look exactly like yours. I use Social Fixer (https://www.facebook.com/Socialfixer) which is a wonderful browser add-on for removing some of the annoying features of FB.)
15 April 2013
Who, who, who
I first saw these cuties on http://efemera-ink.blogspot.com.au/2010/06/wise.html. There are slightly different pattern pieces on http://moonstitches.typepad.com/photos/tutowlrial/index.html.

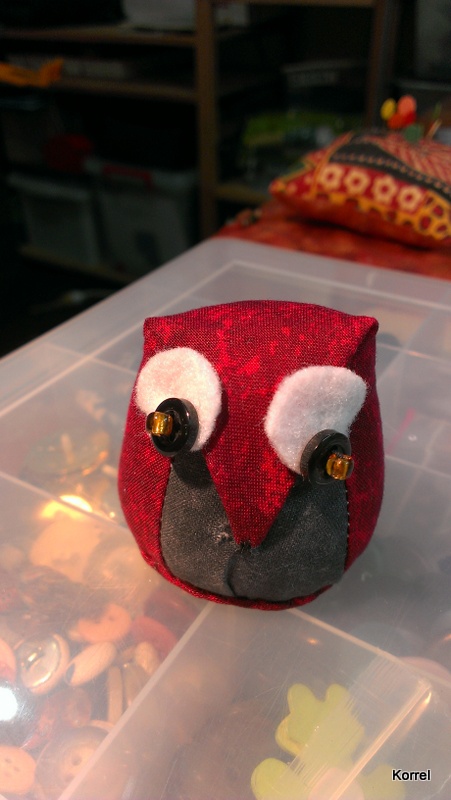


I'm not going to repeat the instructions in detail here, because they are on the other sites, but the basics are - three fabric pieces, one yo-yo insert, eye fabrics or buttons.
Fabric pieces:
- one rounded triangle with 12 inch sides and an 85 degree corner (red in my owl)
- one rounded triangle with 12 inch sides and a 30 degree corner (grey)
- one circle about 6 cm across (red)
Yo-yo base - about 5 cm across. I used two pieces of cardstock glued together. My card was quite thin and I thought two would be sturdier.
Sew the triangles together to form a cone. Fold over the beak and stitch down. Sew on the eyes. I sewed them on after stuffing and it was quite fiddly - he is very small. You notice that my eyes are a little lopsided. Sew a running stitching around the base on the cone. Stuff the cone then pull the base closed. Form a yo-yo with the circle and stitch to the base.
That's it really. Change the length and angles of the triangles to create larger, shorter, fatter, skinnier owls.
14 April 2013
Room (House) Scenting
I read this idea on http://www.aboutamom.com/2011/09/crock-pot-air-freshener.html and thought I'd give it a try.
Take one slow cooker (crock pot), add 4 or 5 cups of water, 1 tablespoon of bicarb for each cup of water, and a suitable room scent.
Mix everything in the slow cooker, turn it on and leave with the lid off for hours. Apparently the bicarb absorbs odours and the scent floats about the rooms. My lavender scent reached all the way to the other end of the house.
Postscript: I thought I'd try lemons, but hubby had cleaned out the fridge. The dry old lemons I thought would be perfect were gone . I used an orange, but I really didn't like the aroma and it wasn't as strong as the lavender. I'll keep experimenting, although my slow cooker pot is looking a little worse for wear tonight.
Take one slow cooker (crock pot), add 4 or 5 cups of water, 1 tablespoon of bicarb for each cup of water, and a suitable room scent.
 |
| One day I will find a bulk supplier of bicarb. I can go through a 500 g box in a day of cleaning. |
 |
| I chose lavender because I like the smell and it's food friendly - I want to use the cooker for actual cooking later. Other options would be vanilla, cloves, lemon or orange (peel would be good) |
 |
| Not the most attractive looking dish! Hoping the white washes out easily. |
13 April 2013
Bathroom cleaning
Bathroom cleaning is a bit like exercise. Not just that it's often hard work and you end up all sweaty and revolting. It's one of those "I don't wanna, but know I feel better afterwards" tasks of life. Our bathroom used to be a bear to clean. The floor was 1970s, dark brown, inchie tiles. No idea what colour the grout was originally. The shower had cracked safety glass that probably didn't look particularly clean the day it was installed. The cubicle was tiled with silicon applied over the top of mouldy grout. Mould will grow through silicon! The basin was cracked and the vanity was chipboard that left chips all over the floor if you so much as breathed near it. It also had a bathtub, the primary purpose of which was to collect dirt, fur and hair.
A couple of years ago we renovated. Oh, bliss. Our new bathroom has an 'all in one' shower cubicle. The walls are lami-panel, the base is moulded, the doors slide so it can be left open to dry out. The basin is a single moulded unit. The splashback is a very large mirror. And the floor, ah, beautiful floor. The floor is red cedar boards.
This post isn't actually about my lovely, still-new, renovated bathroom. It's about cleaning it.
Somewhere along the way, some years ago I picked up a very simple cleaning tip. It helped in the old shower, makes cleaning the new shower a breeze.
In a spray bottle mix 1 part dish washing detergent (daggy old shampoo you decided you hate would work as well) and 3 parts cheap white vinegar (you could use expensive, but it'd be a waste). I label my spray bottle and somewhere on the bottle there's a 1/4 mark. Spray the shower, leave for an hour or so, scrub with a non scratch cloth, rinse. The vinegar works to break down soap scum and mould; the soap simply holds it in place and works on the ordinary dirt.
Do be careful of the fumes when spraying. Yes, vinegar is 'natural', doesn't mean it's harmless. After all, scorpions and red-bellied black snakes are also natural.
One of the issues I've had with the spray (other than the knock-you-out fumes) is that the shower based becomes incredibly slippery while you're scrubbing. I have found a cheap and easy solution - a piece of non-slip matting for under floor rugs. It's non-slip so you don't slide all over the shower while scrubbing, but it's a loose weave, so water flows through it readily.
And a few more gratuitous photos of our bathroom. After nearly two years I still love it and think it was one of the best things we've ever done to our house.
 |
| Pre-renovation |
A couple of years ago we renovated. Oh, bliss. Our new bathroom has an 'all in one' shower cubicle. The walls are lami-panel, the base is moulded, the doors slide so it can be left open to dry out. The basin is a single moulded unit. The splashback is a very large mirror. And the floor, ah, beautiful floor. The floor is red cedar boards.
 |
| Post-renovation |
Somewhere along the way, some years ago I picked up a very simple cleaning tip. It helped in the old shower, makes cleaning the new shower a breeze.
In a spray bottle mix 1 part dish washing detergent (daggy old shampoo you decided you hate would work as well) and 3 parts cheap white vinegar (you could use expensive, but it'd be a waste). I label my spray bottle and somewhere on the bottle there's a 1/4 mark. Spray the shower, leave for an hour or so, scrub with a non scratch cloth, rinse. The vinegar works to break down soap scum and mould; the soap simply holds it in place and works on the ordinary dirt.
 |
| Bathroom spray |
Do be careful of the fumes when spraying. Yes, vinegar is 'natural', doesn't mean it's harmless. After all, scorpions and red-bellied black snakes are also natural.
One of the issues I've had with the spray (other than the knock-you-out fumes) is that the shower based becomes incredibly slippery while you're scrubbing. I have found a cheap and easy solution - a piece of non-slip matting for under floor rugs. It's non-slip so you don't slide all over the shower while scrubbing, but it's a loose weave, so water flows through it readily.
 |
| Anti-slip rug mat |
 |
| Shower cubicle - rounded front design fits nicely in the corner and doesn't need extra floor space to open the door. |
 |
| Vanity with mirror splashback. |
11 April 2013
Handtowels
I've been making hand-towels. I made some originally from a pattern I found in a magazine. The edges were bound, so a bit fiddly. This pattern isn't bound. My original pattern came from Kerryanne English (http://www.woodberrydesigns.com.au/SAB-HangingHandTowel.pdf). I didn't like the square-ness of it, so rounded the shape a little, as you'll see in the photos. Kerryanne's instructions are available from http://shabbyartboutique.blogspot.com.au/2012/11/handmade-gifts-hanging-hand-towels.html, but here's my version - a tutorial in captions.
The way I read Kerryanne's instructions, the steps are slightly different. You sew one bottom edge of the top to the towel, then sew the two pieces together, then topstitch the other bottom edge to the towel. I found I just wasn't getting a nice tidy finish, particularly on the corners. Although it's a little fiddly to pin and topstitch both edges to the towel at once, I'm much happier with the finish.
 |
| A pile of finished hand towels. I prefer dark colours for the towels; they last longer. But there was a white towel in the pack I bought; what can you do? |
 |
| Take one ordinary face washer. Hand towels are a little too large once you add a top to them. |
 |
| Unpick the hem with the tag in it. This gives you a thin surface to sew onto, about an inch extra length and gets rid of the tag. |
 |
| Iron the new area flat. |
 |
| Mark a line on both sides, about 1/2 inch from the edge. This marks where the towel will be sewn into the top, so you don't want too narrow. |
 |
| Cut two pattern pieces from fabric and one from interfacing. The beauty of these is that you can usually find a large enough piece in the scrap box and if you're making them for others, you can make them personal through the fabric choice. |
 |
| A word about the interfacing. The tab top really does need to be stiffened. I made some towels a while ago without interfacing and they're just not pretty once you wash them a couple of times. The first one I made this time, I used bag wadding. I really like the texture it gives the top, but it's a nuisance to work with. I found the easiest way is to cut it smaller and slide it into the top after you turn it right-side out. The second towel I used a light weight, thin wadding (no idea what it was). I forgot to trim it out of the seam allowance, so it added some annoying bulk. The last couple of I've used an iron-in pellon. |
 |
| If using iron-in, cut it about 1/4 inch smaller than the fabric all the way around, except for ... |
 |
| ... the bottom edge. Cut that about 1/2 inch smaller. |
 |
| Standard straight stitch. You don't need a picture, but I want to show off my new machine. |
 |
| Sew the two pieces together, leaving the bottom edge open. |
 |
| Start and finish the seam 1/4 inch from the bottom edge |
 |
| Ditto |
 |
| Snip the corners and turns |
 |
| Pin and iron flat a 1/4 inch allowance on both sides of the bottom edge |
 |
| Tuck that 1/4 inch to the inside when you iron. |
 |
| If you skip this step - you will regret it. |
 |
| Mark the centres of the facewasher and one side of the bottom edge. |
 |
| Match up the centres, lining the edge of the top with the line you drew on the facewasher earlier. |
 |
| Pin the ends of the facewasher inside the top. |
 |
| Pleat the facewasher so that it fits inside the top. |
 |
| I use a single pleat either side of centre. |
 |
| Too many pins is never enough. I find that the pleats have a habit of 'collapsing' and falling out of the seam allowance. |
 |
| If it's easier, pin from the back of the facewasher. When you've attached the facewasher to the top along one edge, carefully pin the second edge as well. |
 |
| Pin and/or iron the entire top flat. I like to pin when I'm topstitching. |
 |
| Topstitch. I've found a fancy, wide stitch along the bottom, with a plain single stitch around the rest works well. |
 |
| Add a buttonhole on the tab, a button on the main section. And you're done. If you prefer, use velcro. I suggest sewing the velcro on before you sew the top together. You can still add a button to the tab, just to be pretty. You could also add embroidery or appliqué before sewing the top together. |
The way I read Kerryanne's instructions, the steps are slightly different. You sew one bottom edge of the top to the towel, then sew the two pieces together, then topstitch the other bottom edge to the towel. I found I just wasn't getting a nice tidy finish, particularly on the corners. Although it's a little fiddly to pin and topstitch both edges to the towel at once, I'm much happier with the finish.
Subscribe to:
Posts (Atom)