14 August 2013

Preferential voting in Australia

It's at about this point in the election campaign someone says to me, "I don't understand preferential voting. It's a waste of time. Why can't we just elect the most popular person and leave it at that?"  Preferential voting is not difficult. And it ensures that the most popular candidate is elected.

Come the election is it crucial that voters understand our preferential voting system. It’s actually not that hard or confusing. It simply means that your vote is influential regardless of who you vote for. Without preferences, minor parties and independents wouldn’t bother standing; they’d rarely, if ever get in.

Our system says a candidate must have an absolute majority of the votes, that is fifty percent plus one vote. If more than two candidates are running for a seat, you can be almost certain no-one is going to get a majority straight up. In some countries they solve this problem by having multiple elections. Round 1 - every one votes, lowest candidate is eliminated from the race. Round 2 weeks or months (and lots of dollars) later - everyone votes again. And so it goes until its a race between just two candidates. Preferential voting does the same thing - in a single election so we don't have to have endless election campaigns.

Here’s how it works:

My electorate of Lah-Lah Land (where lots of pollies live) has four candidates standing for a seat.


We have Jane, ultra conservation, right major party.
Joe, blokey, left major party.
Christine, ultra left, hippy, tree-hugging independent.
Finally, Bob, a little odd and we’re not really sure what he or his party stand for, but he has a winning way with people and they seem to respond to him.


To keep the maths simple, there are 100,000 formal votes (informal votes – those that are incorrectly filled in or defaced – obviously are not counted).

How voters are required to vote is different for different elections (local, state, national). It’s important you check the rules as stated on the paper. In some cases, it is sufficient for you simply put a ‘1’ against your top candidate. Alternatively, you may be required to number every box OR number a certain percentage of boxes.

For ease, in this election we have assumed that candidates must number every box (1 through to 4).

In the first round of counting, the only thing considered is the "1". Votes are separated based on the first preference of every voters. In our electorate that's four piles of papers - one for each candidate.

Of our 100,000 formal votes we get the following results from the first round of counting:
Candidate First Round
Jane 33,000
Joe 21,000
Christine 16,000
Bob 30,000


If a candidate had gained a clear majority – 50% plus 1 (50,001) – they would be declared the winner and we stop right there. However, as no-one has a clear majority counting goes to preferences.

The candidate with the lowest number of votes (Christine, our tree hugger) is eliminated and her ‘preferences are distributed’. These means that her 16,000 papers are distributed according to the number ‘2’ votes marked on them.

For example: I voted ‘1’ for Christine and ‘2’ for Bob. When Christine is eliminated my vote will now count for Bob. Why? Because I decided if I couldn’t have tree-hugging Christine as my representative I’d prefer to have odd-ball Bob rather than the either of the two major parties.

The results of our second round of counting are:


Candidate First Round Second Round Total
Jane 33,000 7,000 40,000
Joe 21,000 4,000 25,000
Bob 30,000 5,000 35,000
Christine 16,000 - -

We still have no clear majority. Again, the lowest candidate is eliminated and their next preference is distributed. That is, Joe (our leftie) is eliminated. The 21,000 voters who placed Joe as ‘1’ will have their second preference counted, and the 4,000 voters who originally voted for Christine will have their third preference counted (their second preference having been Joe). My vote was Christine, then Bob – so it’s not involved in this round of counting. Only the votes that have either gone directly to Joe or have been distributed to him in the second round of counting will be affected.

Our third round of counting results are:

Candidate First Round Second Round Third Round Total
Jane 33,000 7,000 6,000 46,000
Bob 30,000 5,000 19,000 54,000
Joe 21,000 4,000 - -
Christine 16,000 - - -


After the third round we have a clear majority, Bob, the slight odd-ball with no clear policy, is now our sitting member.

Why do we do this? Why is it important to understand how it works and use it wisely?

The preferential system means that the candidate who is ‘preferred’ by the most number of people will be elected.

A lot of people who voted for Christine ‘preferred’ Jane over the other candidates. However, in contest between Jane and Bob, they actually preferred Bob.

Why not just count my first candidate? 
The other option is a ‘first past the post’ system, rather than a majority. In a first past the post system Jane would have been elected, even though she’s not the candidate that most people would prefer to have.

Party preferences 
Often the parties will allocate their preferences. You, the voter, simply put in a ‘1’. If additional rounds of counting are required, your vote is distributed according the preferences nominated by the party. This is all very well IF (big IF) the party’s preferences match your’s. Unfortunately, a lot of voters use the party preference because a) they don’t understand the system and b) it saves them time and effort – particularly on the Senate vote, which can have dozens and dozens of candidates.

How to mark your preferences 
Still not sure how to use your preferential vote? It’s really very simple.

1. Put a ‘1’ against your absolute top candidate. ‘If everything goes the way I think it should this person will be elected.’
2. Think ‘Okay, if number one wasn’t running, who would I vote for out of the rest of these geezers?’, because (essentially) that’s what preferential voting is about. Put a number 2 against that candidate.
3. Continue the process until every box is numbered.

http://www.eca.gov.au/systems/single/by_category/preferential.htm
http://en.wikipedia.org/wiki/Electoral_system_of_Australia#Preferential_voting
http://en.wikipedia.org/wiki/Instant-runoff_voting

12 August 2013

Creativity Journal - Day 18 (Car)

Work with the things you find in your car (or a friend's car if you don't have one).
Until last October, like the vast majority of people around the world, I had never owned a brand new car. I am now the proud owner of a lovely, new, shiny, blue car. With "SMF" in the number plate, naturally it is called 'Smurf'.

When we got married we had an OLD car; a car so old, and so big, and so heavy that steering it in reverse to get out of our curved driveway used to put my back out. Then we bought an almost new car. It was so beautiful. Little did we know that it would subjected to the indignities of a baby and toddler.

I know people who say, "Oh, we'll buy a new car before we have children." My advice, buy an old car. Wait until the children are older - old enough to have their own car is probably okay - and then buy a new car. Children, particularly babies and toddlers, are fond of decorating with food - at all stages of digestion. "Oh," they say, "We won't allow food in our car." Older and wiser parents smile and nod and allow them to continue in their fantasy. When you get stuck somewhere longer than expected and home is a long way away, the 'no food in the car' rule quickly becomes irrelevant, compared to the screaming toddler. And, besides, unlike the drunken friends of your youth, you cannot yell at a baby to hang their head out the window before they spew.

Yes, our lovely, near new car went through all those indignities. And several Nullarbor crossings. The Nullarbor is difficult for people who have never travelled it to comprehend. Our trips were normally from Perth to Melbourne (or return). That's a trip of about 3,500 km, or just under 2,200 miles. I work out that's the equivalent of driving from California to Fort Wayne (it's mentioned in a MASH episode). However, about 1,200 km (745 miles) of that is nothing. This is not Europe nothing or America nothing, this is Australia nothing. In that stretch there are no cities, no towns, no villages, no hamlets, no houses. The best you come across is a petrol station, with a greasy eats. You stop at every single petrol station; a, because you need petrol and b, because you need something different to look at for 10 minutes. How people survive and live out there, I'll never know. I love the bush, but this part of the world takes it to the extreme. By the way, I work out that's about the equivalent of Las Vegas to Denver.

I did have another car. It was even older. It was old when I started driving; it was really old by the time I owned it. I loved it. It went like rocket. It was definitely a lady car and it was going through menopause. It leaked, it had hot flashes (the air-conditioning was long gone), and the stereo consisted of AM radio (no modern fandangled technology for this ol' girl). A small car, on the freeway, without airconditioning, travelling next to B-doubles is no fun. Any car that leaks when it rains is no fun. It was a fun car to drive though.

When hubby was given a car as part of his work package I had to decide whether to keep my rocket or the family car. Sad to say, but comfort (and music) won the day and I reluctantly parted with my car. And I regretted it. Although my car leaked and was hot, it went. Our family car was slowly dying and becoming more and more unreliable. Although I am the child of two motor mechanics, I do not do greasy hands and I haven't a clue where to start looking when something goes wrong. Being stranded on the side of the freeway on a 36°C day is no fun.

Last year we decided we could afford to upgrade. And the new car is mine (at least, that's what the rego says). And being a brand new car I do try to keep it tidy ... well ... tidier. The sole contents of my car were - two jackets, three lolly wrappers, one water bottle. The glove box contains wet wipes, first aid kit, sewing kit (naturally). The back door cup holders have cups and some picnic cutlery. Now, I'm sure if I thought really hard I could have turned all that into something. However, I'm also sure it would have been classified as 'clutter'. (Theme 3: create no clutter.)

However, I was inspired to clean my car. I don't do it very often. I vacuumed and toyed with the idea of making patterns on my carpets. I wiped the insides and all the windows. And then I took my car to the car wash place. And I took photos. They're not wonderful, or outstanding, or even amazing. But I had fun actually "looking" at the water and soap as it played on my windscreen. Not fabric related, not word related (unless you count all those words up there), but also not clutter.


11 August 2013

Creativity Journal - Day 8 Update (book)

Transform an old book into something new by cutting, folding, gluing, and so on.
I finished this challenge a couple of weeks ago, I just forgot to post about it. I finally overcame my hesitation (paranoia) about cutting up or destroying a book. I will confess going to two op shops before I found the 'right' book. I didn't even really know what I wanted to do with it, and still I couldn't choose a book. "Too plain, too fancy, too many pictures, too many photos." Sigh!

Finally I found a book that was a good mix of words and photos. In the end - I didn't use any of the photos at all. Still, I've saved them, I'm sure they'll come in handy for something. One day.

I found a poster on Pinterest that I really liked.

I wanted to make my own version; something uniquely ours rather than a copy. Knowing I planned on working with cut outs, I designed it in Excel using bold fonts, no thin line fonts. I used Excel because it allows for limitless page size.

I had already bought a canvas. I didn't buy a square canvas, because it wouldn't work in the space I was planning to use. My canvas is twice as long as it high, so although I was using the above layout as a guide, I had to think about my own design elements. Once I decided on what words were going on what lines, I used Word Art to allow me to drag the words bigger, higher, wider (or smaller, shorter, narrower) in the space I wanted.

The fonts I used are:
  • Rockwell Extra Bold (twice)
  • Cooper Black
  • Berlin Sans FB Demi
  • Franklin Gothic Heavy
  • Arial Black

When I finally had a design that met the Teen's approval (my art critic) I printed out the lettering. I rough cut each letter, laid it over the section of the book's page I wanted to use and then cut through both layers with a craft knife. Much easier than cutting out the letters, drawing the letters onto the page, then cutting out the page.
My letters all cut out and ready to go. I considered cutting out the pictures from the book somehow to make a collage background for the canvas. I decided that it would be too busy and not the look I was hoping for. In the end I squirted rows of green and white paint on to my canvas and just sort of smoshed them about with a brush.
The end result was quite evenly coloured, but it has a hint of variation. Because the paint ended up quite thick, I used it to 'glue' the letters down. Sadly, that means not guide lines and my letters are little wonkier in placement than I would like. If I did it again, I lay out my lettering before I painted the canvas and draw faint guide lines to get a more even layout. Everything should be moved down just slightly; the 'most' is supposed to tuck into the 'h' of 'house' - not sit over the top of it; and the 'share' line has a slight slope, but these things are hard to remember when you're working on the fly.

Apologies for the poor quality picture. I think I must have taken it in the afternoon, when the sun comes through the window behind this opening.

Creativity Journal - Day 17 (Eyes)

Make something inspired by and/or that goes over an eye (yours or someone else's).
Day 17 was another day of 'trials and errors'. This challenge inspired me to consider making sleep masks for sale. I wanted something a little different to that available online. Ebay had a couple of version that people make. I didn't simply want to be a copy cat. I thought what I could do is put the expensive embroidery machine to some use. I do use it, just not as much as its price tag warrants. Here is a record of my trials:
The lovely curly-cued and decorated 'S' I wanted to use was too big for a sleep mask. I shrunk it about half in my embroidery program. In theory, the density of stitches should adapt accordingly. In practice, they just get shorter.


I wanted to use a satin-like fabric. A, because I have some, and B, because it has a nice texture on the face. As you can see, I didn't even get part way through the first trial stitch-out. The thread breakages got to me and I realised it was going to pucker and pull the fabric dreadfully.
I tested it on calico (one of my tea stains from Day 13) to see whether it was just the fabric or not. Not. And then the fun began. I've done some really basic editing of embroidery files: merged letters to make monograms, deleted some sections I didn't want on an image. I ended up spending three days working on this one file. Embroidery files are a little like clipart. There's a 'dot' at every point where you want a stitch. It's not simply a matter of drawing a shape and colouring it in. Every single thread is drawn, aligned, and 'dotted'.
In this attempt, the three densest sections - the top curl, end curl, and lower curve - have been 'thinned out'. Each of these sections is a series of lines in one direction then back. I took out every second line, which meant I had a series of lines all running in the same direction. In a drawing this obviously is a non-issue, when you're stitching the end of one line has be the start of the next OR you have to be prepared to deal with 'jump stitches'. A jump stitch is a loose stitch, which you cut off when the stitching is finished. The less jump stitches the better. When I grasp the issue of the jump stitches, the answer was fairly straight forward. You simply reverse the stitch direction on every second line; reverting the entire section to 'one direction and back'.

Although this stitch-out is flatter, it's still got a fair bit of pull and pucker. The issue, of course, is all the curly-cues. They are all double-stitched - out to the end and back again. At full size the double stitching isn't a problem; at the half size they were too weighty. I thought it would be easy enough to set them all to single stitch and deal with some jump stitches.
Alas, as you can see if you compare the curly-cues on the above photo with the one before it, it didn't work. I think (although I'm not 100% sure) what happens is, if jump stitches are too short, they just become regular stitches. Hence, the loss of pretty, defined curly-cues and the addition of ... well ... mess.

After playing for hours and hours and hours with these darn curly-cues, I decided - smeg it. I don't need them. I deleted them. Eeek, aaak, disaster. The tails of the curly-cues link the three other sections; the two narrowest sections of the 'S' are curly-cue tails. More hours, and hours, and hours of grabbing and dragging little dots on my screen. Lots of false starts, lots of "smeg it, forget it, no I can't", finally:
Ah, yes. Certainly not as a pretty as the original, but it worked on calico at the reduced scale. Would it work on my satin-like fabric? I did some research into stitching onto slippery fabrics. One website, Crafty Stitcher, recommended two layers of Solvy (a dissolvable, plastic sort of stuff). I wasn't sure if that was two layers underneath, so I went with sandwiching the fabric between the two layers. I got as far as top-stitching my completed sleep mask when I noticed disaster:
The embroidery had 'cut' the fabric, and not just in one place. Sigh. Still, I hadn't spent three days editing the pattern and trialling a half dozen samples to quit now! Oh, no. I decided to try iron on interfacing on the back of my satin-like fabric. And it seems to have worked.
My first mask I sewed right-sides together and then turned in the right way. This one (I was pretty over the whole thing by this point), I sewed wrong-sides together, satin-stitched around the edge and trimmed away the excess. I didn't like it at first, but the satin-stitching is growing on me. The back is soft black polar fleece. The elastic should be black. I wasn't really thinking beyond the embroidery by this point.

I have learnt a lot about machine embroidery designing and that I probably don't want to make enough of these to sell them, but if you'd really like one just leave a comment with your preferred colours (fabric and thread) and I'll get back to you.


07 August 2013

Creativity Journal - Inspired

Yesterday I was suffering from a bad case of "unemployed blahs". These come and go through the weeks. I have never, ever been out of work for more than a couple of weeks. Now four months and counting. sigh The really disheartening thing is that I am (supposedly) so much more employable than I ever have been. Since the last time I went job hunting, I have gained a Bachelor's degree, I have gained a Graduate Certificate, I am half way through a Masters degree. double sigh

You read these inspiring articles online or in the magazines - if you're not doing what you love, make some changes, get a new qualification, start again, blah, blah, blah. Well, I did that and at this point in time, it's not working out so well.

Which isn't to say I regret it. I don't. I am very proud of my qualifications. Not the end result, the bit of paper, per se, but that I actually stuck it out - through all the stress, the illness (yes, studying made me seriously ill), the never-ending-ness of it. I'm starter, not a finisher. I love new projects. I love shiny. I love potential. I get bored with the day-to-day of things pretty quickly. Dishes, laundry, filing, timesheets - blurgh. But I stuck it out for six long years and I actually finished it. I proved to myself, in a grand way, that although I don't enjoy the blah, I can see it through.
Just keep swimming, just keep swimming, oh, look at that ...

The irony of my unemployment is not lost on me. Most jobs in my post-grad field are Sydney based. If there is one place on the planet that I simply do not wish to live (and neither does the family), it's Sydney. We're not really city people; we 'cope' with Brisbane living. I think Sydney would send us all around the bend within a week. Most jobs in my grad field,for someone with my limited experience, are site based. Which would be wonderful, if I were the standard graduate with five years experience - mid 20s, young, unattached, footloose and fancy free (I have vague memories of those days). The 'fly in-fly out' or 'drive in-drive out' lifestyle gets very old, very quickly even if you are in the right age bracket. For someone fast approaching, ummm, twice that age bracket, with a teenager, with a husband, with a life - it gets old even before you start. And my pre-grad field? Well, I'm too qualified and no-one's even nibbling.

Some days I really enjoy staying home, getting up late, pottering about in my PJs, baking in the middle of the day, not stressing about how to fit my studies into 5 minute blocks of time. But some days the budget and boredom and the lack of mental challenge and, quite frankly, the rejection, all pile up and this feels like a big pile of poo. double sigh.

photo credit: f1uffster (Jeanie) via photopin cc

And yesterday was one of those days. I thought I'd check the next creativity journal challenge. I got thinking about it. I worked on something that meets the challenge. And then I was inspired. I'm still thinking it through. I'm not sure how it's going to pan out. I'm not convinced it the answer to my unemployment blues, but I'm going to take the first step or two and see what happens.


One thing's for certain, today will be too busy for the blues to stick around for long. I'll let you know how it all pans out.

06 August 2013

Cooking adventures

Crockpot Cashew Chicken
Apple Crumb Cake
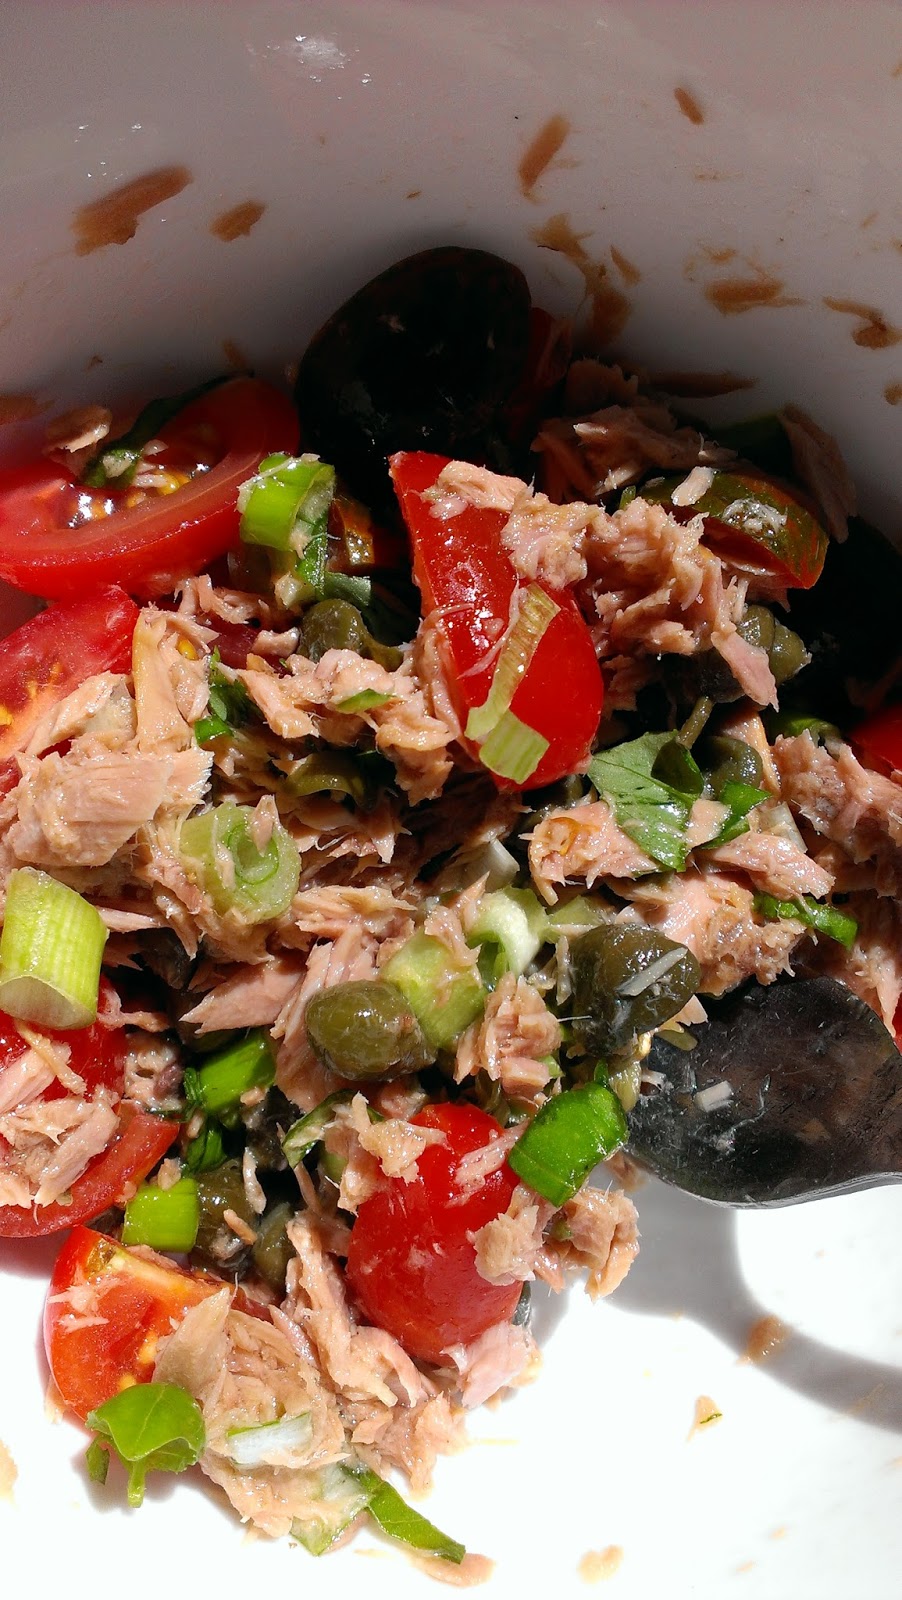
Tuna and Caper Salad
Keeping green onions fresh

Tonight I tried two new recipes, and what do you know - they both worked!

First, one of those "share and save it to your wall" recipes from Facebook. Some recipes are genuine, some; however, a simply a 'plot' to get a lot of page likes so they can sell the page for bizarre amounts of money. Still this one sounded okay and I thought I'd try it.

Crockpot Cashew Chicken

Ingredients:
1 kg (2 lbs) boneless, skinless chicken thigh tenders or chicken breast tenders
1/4 cup plain (all purpose) flour
1/2 tsp black pepper
1 Tbsp oil
1/4 cup soy sauce
2 Tbsp rice wine vinegar
2 Tbsp tomato sauce (ketchup)
1 Tbsp brown sugar
1 garlic clove, minced
1/2 tsp grated fresh ginger
1/4 tsp chilli (red pepper) flakes
1/2 cup cashews

Directions:
Combine flour and pepper in large bag. Add chicken. Shake to coat with flour mixture. Heat oil in skillet over medium-high heat. Brown chicken about 2 minutes on each side. Place chicken in slow cooker. Combine soy sauce, vinegar, ketchup, sugar, garlic, ginger, and pepper flakes in small bowl; pour over chicken. Cook on LOW for 3 to 4 hours. Add cashews and stir. Serve over rice. Makes 4-6 servings.
If you like the sauce and want to have some to pour over the chicken and the rice, double the sauce ingredients.

Comments:
  • Use larger pieces of chicken, say about 2 inch cubes. 
  • I added fresh tumeric; I add it to everything I can because it's good for you. 
  • The shorter cooking time in the slow cooker is a bonus if you're at home mid-afternoon. 
  • I probably wouldn't be doubling the recipe to get sauce, I think it would be far too strong a taste. I think you could possibly add 1/4 to 1/2 cup of stock or water in the last hour or so of cooking to create a sauce that wasn't overpowering.

  • I forgot to take a photo, this one (for exactly the same recipe) is from Favourite Family Recipes. Mine turned out a fair bit darker and less "clean" looking.


    Apple Crumb Cake
    Second dish of the night was Apple Crumb Cake. I had a hankering for apple cake and my CWA cook book let me down. Unbelievable that the country women of this country didn't cook apple cakes. I was thinking about cinnamony tea cake thing we cooked in home ec all those decades ago. When I went looking for recipes; however, I found an apple tea cake with a crumb topping and I was reminded of a MASH episode in which BJ receives a Dutch apple crumb cake from Peggy. Enough coincidences for me.

    The recipe is on Taste.com.au - Apple Tea Cake Recipe.

    My comments on the cake: I used 'ras el hanout' instead of cinnamon. I love this spice mix. I was introduced to it by Vanilla Zulu; Mel uses it in brownies (divine). I've used it before in apple crumble. It works really well with apples.

    I created the crumble mix in the blender. I use the blender for my apple crumble topping and scones (just the flour and butter stage) as well. I find it works just as well rubbing the butter in by hand, if not better. And it's certainly a lot quicker.

    I wasn't sure from the instructions if the apples were supposed to be wedges or slices. In the end I decided on wedges (8 per small apple). I put most of them around the outside, based on a comment from another cook, and a few in the centre. It seems to have worked well.

    This time I did remember to take a photo. A little easier, because we didn't eat it all in one sitting.

    Tuna and Caper Salad
    And while we're discussing food. Lunch yesterday. I don't dislike tuna. Weirdly, I just dislike the idea of tuna. I look at the tin and think, "blurgh, thanks but no thanks". If I actually eat it, hey, it's okay. Yesterday, I was inspired - tuna and capers. I love, love, love capers. Not caper berries. Capers are the flower buds of the Capparis spinosa plant that have been salted and pickled. Caper berries are bigger and are the fruit, also salted and pickled. My thought process was, if I put capers in tuna it would have to improve it. Mmmmm. My recipe - one small tin of flaky tuna in springwater, a spoonful of capers, a couple of cherry tomatoes quartered, a stalk of spring onion (or green onion or shallots, depending on what you call them), and a few shredded leaves of basil. Mix. Yummy.

    Keeping Spring/Green Onions/Shallots
    And finally, a hint for storing spring onions/green onions/shallots. When you buy a bunch of onions, pick ones with long roots still attached. If you're a disciplined type, you can stick the bunch into a glass of water. Change the water every day and rinse the onions. When you use an onion, cut it about an inch from the roots. It will regrow. If, on the other hand, you're like me and not so disciplined. Set a small flower on pot on the kitchen window and replant the onions when you buy them. Same thing - cut the onion about an inch from the top of the dirt. The onion will regrow, often several times.

    I often buy spring onions, use two or three stalks from the bunch, and the rest ends up drying out in the fridge (or going slimy). This way, my onions keep for weeks, if not months. Plus I get a second and often even a third regrowth from a single bunch.


    05 August 2013

    Creativity Journal - Day 16 (Stamping)

    Make a unique print by cutting up a potato or sponge, and use it to stamp on a material of your choice.
     
    Again, I’ve been missing in action. The good news is that my creativity continues, even if my blogging is somewhat erratic. Today’s challenge fester in the back of my mind as I completed some paid work (woohoo), drafted an essay for uni, created three 80s costumes for a theme party, and generally kept up with off-line living.

    My efforts do not reflect either of my themes, but are in keeping with my ‘create no clutter’. We had a birthday party to attend. I have a box full of gift bags and paper shop bags. The plan was to buy a five cent washing up sponge, cut it, paint it, and stamp a paper bag to use as a gift bag. If the bag has a shop name on it, a piece of card with the recipient’s name or “happy birthday” covers it and you’re good to go.

    Naturally, I didn’t take any photos of the finished product. I was too busy admiring the effect of the dish sponge. I used ordinary acrylic paint – silver on brown paper. To get an even image, I used one of my Perspex stamping blocks to push the sponge down; I didn’t bother attaching the sponge. When I was finished, I decided that washing out the sponge to store and reuse would use more water than it was worth, so some small clutter.

    five cent sponges (well, sort of, nothing's five cents anymore)

    Star cut out

    Paint, silver acrylic

    presser

    Stamped bag. A name tag was placed over the shop's stamp.

    Close up. Isn't that fun?

    Another close up