07 August 2013

Creativity Journal - Inspired

Yesterday I was suffering from a bad case of "unemployed blahs". These come and go through the weeks. I have never, ever been out of work for more than a couple of weeks. Now four months and counting. sigh The really disheartening thing is that I am (supposedly) so much more employable than I ever have been. Since the last time I went job hunting, I have gained a Bachelor's degree, I have gained a Graduate Certificate, I am half way through a Masters degree. double sigh

You read these inspiring articles online or in the magazines - if you're not doing what you love, make some changes, get a new qualification, start again, blah, blah, blah. Well, I did that and at this point in time, it's not working out so well.

Which isn't to say I regret it. I don't. I am very proud of my qualifications. Not the end result, the bit of paper, per se, but that I actually stuck it out - through all the stress, the illness (yes, studying made me seriously ill), the never-ending-ness of it. I'm starter, not a finisher. I love new projects. I love shiny. I love potential. I get bored with the day-to-day of things pretty quickly. Dishes, laundry, filing, timesheets - blurgh. But I stuck it out for six long years and I actually finished it. I proved to myself, in a grand way, that although I don't enjoy the blah, I can see it through.
Just keep swimming, just keep swimming, oh, look at that ...

The irony of my unemployment is not lost on me. Most jobs in my post-grad field are Sydney based. If there is one place on the planet that I simply do not wish to live (and neither does the family), it's Sydney. We're not really city people; we 'cope' with Brisbane living. I think Sydney would send us all around the bend within a week. Most jobs in my grad field,for someone with my limited experience, are site based. Which would be wonderful, if I were the standard graduate with five years experience - mid 20s, young, unattached, footloose and fancy free (I have vague memories of those days). The 'fly in-fly out' or 'drive in-drive out' lifestyle gets very old, very quickly even if you are in the right age bracket. For someone fast approaching, ummm, twice that age bracket, with a teenager, with a husband, with a life - it gets old even before you start. And my pre-grad field? Well, I'm too qualified and no-one's even nibbling.

Some days I really enjoy staying home, getting up late, pottering about in my PJs, baking in the middle of the day, not stressing about how to fit my studies into 5 minute blocks of time. But some days the budget and boredom and the lack of mental challenge and, quite frankly, the rejection, all pile up and this feels like a big pile of poo. double sigh.

photo credit: f1uffster (Jeanie) via photopin cc

And yesterday was one of those days. I thought I'd check the next creativity journal challenge. I got thinking about it. I worked on something that meets the challenge. And then I was inspired. I'm still thinking it through. I'm not sure how it's going to pan out. I'm not convinced it the answer to my unemployment blues, but I'm going to take the first step or two and see what happens.


One thing's for certain, today will be too busy for the blues to stick around for long. I'll let you know how it all pans out.

06 August 2013

Cooking adventures

Crockpot Cashew Chicken
Apple Crumb Cake
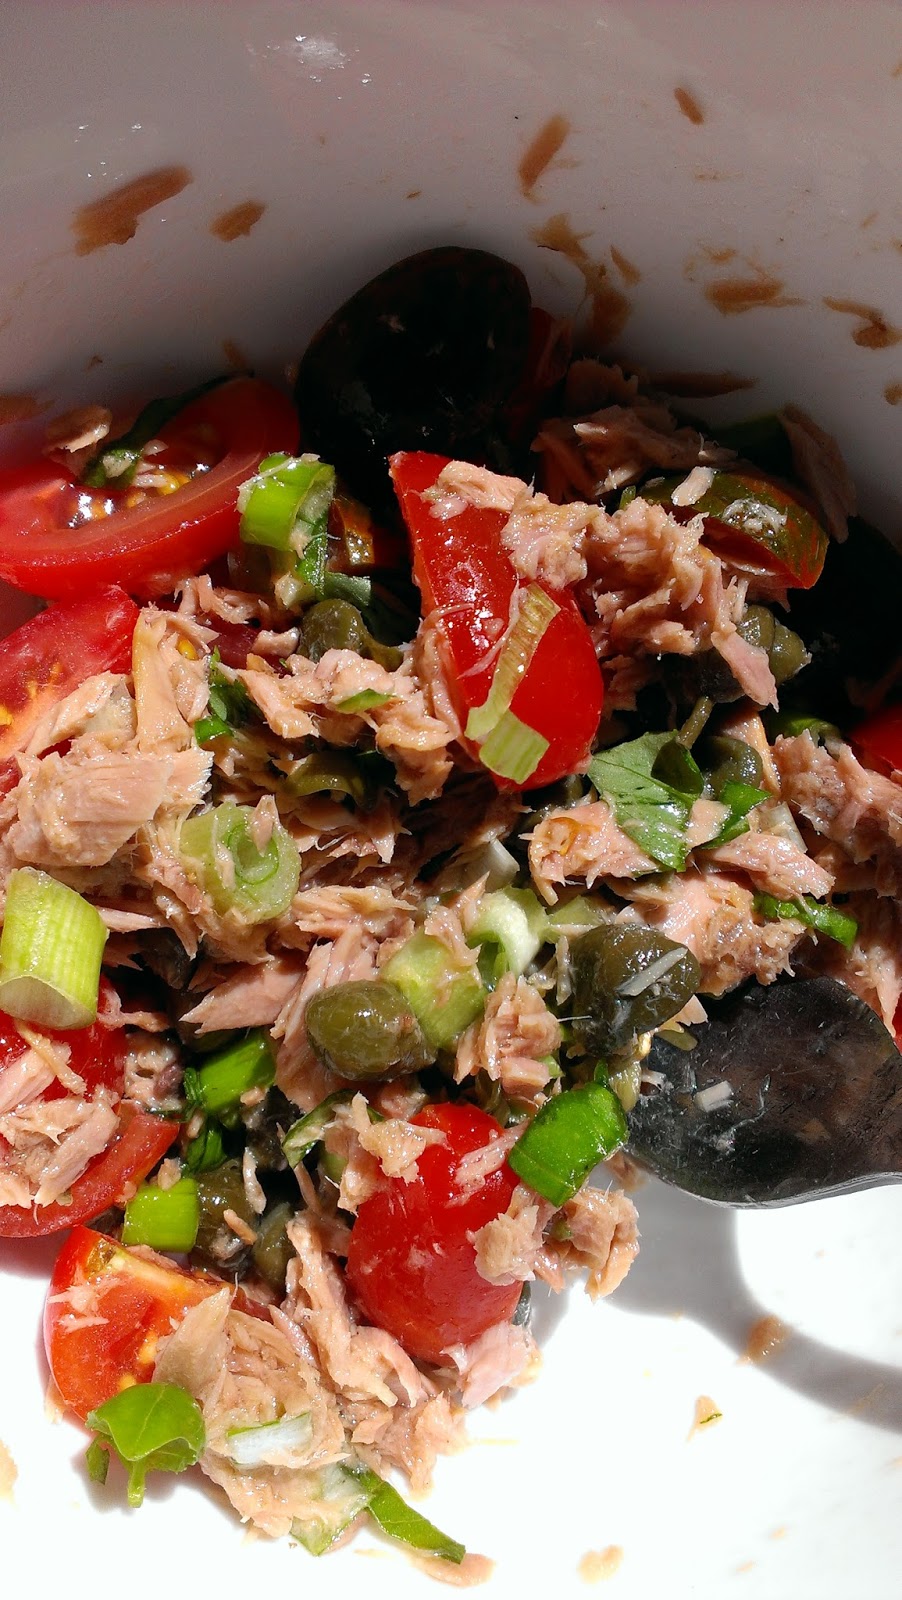
Tuna and Caper Salad
Keeping green onions fresh

Tonight I tried two new recipes, and what do you know - they both worked!

First, one of those "share and save it to your wall" recipes from Facebook. Some recipes are genuine, some; however, a simply a 'plot' to get a lot of page likes so they can sell the page for bizarre amounts of money. Still this one sounded okay and I thought I'd try it.

Crockpot Cashew Chicken

Ingredients:
1 kg (2 lbs) boneless, skinless chicken thigh tenders or chicken breast tenders
1/4 cup plain (all purpose) flour
1/2 tsp black pepper
1 Tbsp oil
1/4 cup soy sauce
2 Tbsp rice wine vinegar
2 Tbsp tomato sauce (ketchup)
1 Tbsp brown sugar
1 garlic clove, minced
1/2 tsp grated fresh ginger
1/4 tsp chilli (red pepper) flakes
1/2 cup cashews

Directions:
Combine flour and pepper in large bag. Add chicken. Shake to coat with flour mixture. Heat oil in skillet over medium-high heat. Brown chicken about 2 minutes on each side. Place chicken in slow cooker. Combine soy sauce, vinegar, ketchup, sugar, garlic, ginger, and pepper flakes in small bowl; pour over chicken. Cook on LOW for 3 to 4 hours. Add cashews and stir. Serve over rice. Makes 4-6 servings.
If you like the sauce and want to have some to pour over the chicken and the rice, double the sauce ingredients.

Comments:
  • Use larger pieces of chicken, say about 2 inch cubes. 
  • I added fresh tumeric; I add it to everything I can because it's good for you. 
  • The shorter cooking time in the slow cooker is a bonus if you're at home mid-afternoon. 
  • I probably wouldn't be doubling the recipe to get sauce, I think it would be far too strong a taste. I think you could possibly add 1/4 to 1/2 cup of stock or water in the last hour or so of cooking to create a sauce that wasn't overpowering.

  • I forgot to take a photo, this one (for exactly the same recipe) is from Favourite Family Recipes. Mine turned out a fair bit darker and less "clean" looking.


    Apple Crumb Cake
    Second dish of the night was Apple Crumb Cake. I had a hankering for apple cake and my CWA cook book let me down. Unbelievable that the country women of this country didn't cook apple cakes. I was thinking about cinnamony tea cake thing we cooked in home ec all those decades ago. When I went looking for recipes; however, I found an apple tea cake with a crumb topping and I was reminded of a MASH episode in which BJ receives a Dutch apple crumb cake from Peggy. Enough coincidences for me.

    The recipe is on Taste.com.au - Apple Tea Cake Recipe.

    My comments on the cake: I used 'ras el hanout' instead of cinnamon. I love this spice mix. I was introduced to it by Vanilla Zulu; Mel uses it in brownies (divine). I've used it before in apple crumble. It works really well with apples.

    I created the crumble mix in the blender. I use the blender for my apple crumble topping and scones (just the flour and butter stage) as well. I find it works just as well rubbing the butter in by hand, if not better. And it's certainly a lot quicker.

    I wasn't sure from the instructions if the apples were supposed to be wedges or slices. In the end I decided on wedges (8 per small apple). I put most of them around the outside, based on a comment from another cook, and a few in the centre. It seems to have worked well.

    This time I did remember to take a photo. A little easier, because we didn't eat it all in one sitting.

    Tuna and Caper Salad
    And while we're discussing food. Lunch yesterday. I don't dislike tuna. Weirdly, I just dislike the idea of tuna. I look at the tin and think, "blurgh, thanks but no thanks". If I actually eat it, hey, it's okay. Yesterday, I was inspired - tuna and capers. I love, love, love capers. Not caper berries. Capers are the flower buds of the Capparis spinosa plant that have been salted and pickled. Caper berries are bigger and are the fruit, also salted and pickled. My thought process was, if I put capers in tuna it would have to improve it. Mmmmm. My recipe - one small tin of flaky tuna in springwater, a spoonful of capers, a couple of cherry tomatoes quartered, a stalk of spring onion (or green onion or shallots, depending on what you call them), and a few shredded leaves of basil. Mix. Yummy.

    Keeping Spring/Green Onions/Shallots
    And finally, a hint for storing spring onions/green onions/shallots. When you buy a bunch of onions, pick ones with long roots still attached. If you're a disciplined type, you can stick the bunch into a glass of water. Change the water every day and rinse the onions. When you use an onion, cut it about an inch from the roots. It will regrow. If, on the other hand, you're like me and not so disciplined. Set a small flower on pot on the kitchen window and replant the onions when you buy them. Same thing - cut the onion about an inch from the top of the dirt. The onion will regrow, often several times.

    I often buy spring onions, use two or three stalks from the bunch, and the rest ends up drying out in the fridge (or going slimy). This way, my onions keep for weeks, if not months. Plus I get a second and often even a third regrowth from a single bunch.


    05 August 2013

    Creativity Journal - Day 16 (Stamping)

    Make a unique print by cutting up a potato or sponge, and use it to stamp on a material of your choice.
     
    Again, I’ve been missing in action. The good news is that my creativity continues, even if my blogging is somewhat erratic. Today’s challenge fester in the back of my mind as I completed some paid work (woohoo), drafted an essay for uni, created three 80s costumes for a theme party, and generally kept up with off-line living.

    My efforts do not reflect either of my themes, but are in keeping with my ‘create no clutter’. We had a birthday party to attend. I have a box full of gift bags and paper shop bags. The plan was to buy a five cent washing up sponge, cut it, paint it, and stamp a paper bag to use as a gift bag. If the bag has a shop name on it, a piece of card with the recipient’s name or “happy birthday” covers it and you’re good to go.

    Naturally, I didn’t take any photos of the finished product. I was too busy admiring the effect of the dish sponge. I used ordinary acrylic paint – silver on brown paper. To get an even image, I used one of my Perspex stamping blocks to push the sponge down; I didn’t bother attaching the sponge. When I was finished, I decided that washing out the sponge to store and reuse would use more water than it was worth, so some small clutter.

    five cent sponges (well, sort of, nothing's five cents anymore)

    Star cut out

    Paint, silver acrylic

    presser

    Stamped bag. A name tag was placed over the shop's stamp.

    Close up. Isn't that fun?

    Another close up

    28 July 2013

    Creativity Journal - Day 15 (Dollar Bill)

    What can you do with just a dollar? Use a dollar bill as your medium or inspiration today.
    Using a dollar bill is a little difficult for an Australian. If I actually owned one, had had the forethought as a teenager to save one, it might be worth too much to be playing with it. Luckily, I didn't keep one, so no conflict of values.

    As I am Australian, I decided to work with a dollar coin.
    According to my new Celco circle template (why haven't I bought one of these before), it has a 25mm diameter. Drawing around a coin is an annoying task, so I used my lovely new template (quite fond of this bit of plastic).
    My first attempt was to replicate a Sashiko pattern I like. Shashiko is a form of Japanese quilting. It's usually done with a thick white thread on navy or dark blue. The patterns are often repetitive or overlapping patterns.

    The pattern I was aiming for is the circles in the bottom right-hand corner of the above sampler. Only, I thought I could draw it without looking it up. I can't even draw it when it's sitting right in front of me, so I don't know why I thought that.

    Attempt one:
    I overlapped too many circles (didn't realise that at the time). I did notice that each circle ended up with 12 'bits' as you went around the edge. I started to colour them rainbow-like, with 6 colours - red, orange, yellow, green, blue, purple. At some point, in the above colouring I got a little confused.

    I thought, if I did it in Paint, I could fix my mistakes. In Paint I also noticed that using the 6 colours around each circle led to a secondary pattern, which totally hides the first pattern.
    And just for fun, I inverted the colours. I think this one looks a little like fish.


    I wasn't particularly happy with my efforts, and as I was enjoying a day on the couch being a sloth (an ill sloth, but a sloth nonetheless), I started doodling. I started with some random overlapping circles; wasn't happy with those (bottom centre). Then tried a "Hungry Caterpillar"; wasn't happy with that (bottom right). Finally, I just started drawing circles and filling them in.
    When I ran out of room on the page, I moved on.
    It was difficult to come up with a different pattern for each and every circle. I'm pretty sure some are repeated, particularly those hidden in the background. My Teen is a keen zentangler, and much, much better at it than I am. She was a little concerned I was 'taking over her thing'; she need have no fear. Needs too much patience for me.

    27 July 2013

    Creativity Journal - Day 14 (Small)

    Make something microscopic. How small can you work? Can you make something that requires a magnifying glass or microscope to see?

    The hardest thing about this challenge was getting a decent photo. The words came to me overnight. I Googled, but I can't find any specific reference, just a quarter of a million links.

    No life is small.

    My first attempt was in Paint, created at 800% magnification.
    Original size

    'Small' size; most of my blog photos are set to medium size
    Letters are 5 pixels high, all verticals only 1 pixel wide

    My next attempt was fabric based. Thought I might use up some of my tea-staining throw outs. Not very much of them, as it turns out. My first effort was done with the naked eye, well, the bespectacled eye. I got a little lost trying to get the 's' right in 'is small'.
    For my second effort I found a magnification app for my phone. Once I worked out how to balance it and sew neatly, my letters improved ... well, slightly.
    First effort, fine needle showing beneath the text

    Second effort

    Both efforts, my fingers

    First effort above, second effort inside the small gold safety pin

    Second effort, same small gold safety pin

    26 July 2013

    Creative Journal - Day 13 (Tea)

    Use tea leaves or tea bags (used or unused) or even just liquid tea (in a cup or not) to create something today.
    I appear to have been missing in action for a few days. I was simply experimenting with various tea options. As a quilter 'tea dying' is a common term. Apparently, quilters use tea (and coffee) to dye fabrics to give them an 'ol' world charm'. Maybe I'm doing it wrong, but most things just looked stained to me.

    My first attempt, I thought I'd write a word with a crayon on fabric and dye it.
    If you look really, really, really closely you might be just able to make out the word "study". However, it wasn't heavy enough to resist the tea staining and can't be seen at all in the dry fabric.

    Take 2, I decided to shave wax on to the fabric, cover it with baking paper and iron it in. My theory is that the wax would penetrate the fabric and could be washed out later. Home-made batik.

    Ah, all very well in theory.


    The final, dry fabric has just got a slightly pink, slightly brown patch in the centre.

    Take 3 (I didn't even take photos) - I piled tea leaves in the pattern I wanted on the fabric and left it sit. However, the stain spread and I ended up with just a slightly brown patch in the centre.

    Take 4 (oh, yeah, that's why I've been missing in action for so long) - I taped off the areas I didn't want stained. It worked somewhat better than the first three options. Unfortunately, my perception of negative space isn't too crash hot and I was missing an outside bor
    der to my image. Again, a slightly brown patch in the centre.

    So, today, I finally called the tea dying quits. Instead I opted for the easy path. A "tea T".
    All I can say is, good thing I drink tea every day!

    24 July 2013

    SocialFixer

    If, like millions of others, you use Facebook; and if, like sane people everywhere, you avoid using Internet Explorer, then you really should be using SocialFixer. SocialFixer helps to eliminate some of the more annoying aspects of FB. I don't use all the options on offer, I doubt anyone does. The main strength of SocialFixer is it allows you to use FB how you want.

    One of the main features I like is the tabbed newsfeed. My newsfeed is so full of shared photos and junk that I miss the actual going ons in my friends' lives. With the use of filters, I can push page updates, group posts, shared photos, and 'stuff' to separate tabs. I can even hide posts I just don't want to see.


    The filtering use a code system I haven't used before. I'm familiar with the code needed for Microsoft macros and database programming and I'm familiar with standard Boolean code. I have never used "regular expressions" before. It's taken a bit of trial and error to work out how to filter my FB newsfeed just how I want, so I thought I'd share.


    The basics (that I use and as I understand, and I'm open to helpful comments) are:

    • use a / to open and close an argument /this is my argument/
    • use a | to denote a "or" option /search for this|that/
    • use i after the argument to make case irrelevant /search Upper or lower case/i
    • .* searches for wildcards i.e. a string of characters of varying lengths and types (I can never remember how to search for an actual fullstop/period, so I don't use them in my filter strings)

    My current filters are below. The filter string that I use in shown in blue. I've given some examples of the types of posts it picks up. I've used grey to show text that isn't included the filter, and orange to show text that is picked up by the wildcard (.*)
     
    /added .* photo|was tagged in .*'s photo/i  - moves to Photos tab
    Jane added 6 photos
    Bill added a new photo
    Bill added 6 new photos
    Bill was tagged in Jane's photos

    /shared .*'s photo|shared .*'s status update|likes a photo|.* (shared|likes) a link/i - moves to Shares tab
    Jane shared Bill's photo
    Jane shared Bill's status update
    Bill likes a photo
    Bill shared a link
    Bill likes a link

    One could argue why not simply use /shared .*'s/ or even /shared .*/ rather than including two strings with 'photo' and 'status update'? I have found that sometimes the more definitive string is safer. A friend may post a status update along the lines of "I shared Bill's coffee" or "We shared a coffee", which is not the same as sharing Bill's viral photo.

    /added .*|changed .* profile picture|updated .* cover photo/i - moves to "Timeline" tab
    Jane added Bill as a friend
    Jane changed her profile picture
    Jane updated his cover photo


    /Group Name|Group Name/i - moves to Groups tab
    Simply copy the group name from your list and use in the filter. Be aware of punctuation that requires code to be read as actual punctuation. As I mentioned, I can never remember it, so I just use 'bits' of my group names, to avoid the full stops and the like.

    Pages - in the far left column of the filtering tab of SocialFixer, is a list of your friends. At the bottom of this list is a list of your pages. Simply highlight all of them, and move them to a "Pages" tab.

    These five filters save me a lot of "argh" moments. My home tab is mainly status updates directly from my friends and not repeated rubbish. I'm sure there are other "standard" posts pushed through by FB; as I find them I add them to my filter strings.