19 December 2013

Tissue box holder

I found a hanging cover for a tissue box on Pinterest (http://www.apalog.com/studio-clip_craft/archive/76#BlogEntryExtend). There is a PDF of instructions how to make it on the website. One small issue - everything is in Japanese.

I decided it wasn't too difficult and I could probably fudge my way through it. To be on the safe side, I chose a piece of scrap fabric with a bit of a stretch. I won't attempt to give you a full tutorial, but perhaps just a brief overview.

The features of the bag is that it holds a normal size box of tissues, has a flap at one end to change the boxes when empty, and a strap that buttons on to enable it be hung. It's the hanging that appeals to me. I like to keep a box of tissues in the car, but they're a bit awkward to stash. This bag will allow the box to be hung behind a front seat.


The seam of the main body piece will form the opening for the tissues. I stitched normal from the end to the beginning of my opening; lengthened my stitch to 6 for the opening, and reverted back to normal for the other end of the seam. I made the lining and outer exactly the same.

The flap is slightly rounded on the front. I really wasn't sure how to tackle the flap, so I don't know if this is the best way. I sewed a flap piece to the outer and to the lining of the body, opposite the seam for the opening. That is, the opening is in the middle on the front, the flap is on the back. I sewed the lining to the outer around the flap and the three sides of the top.

I then sewed the base out to the outer. I only partly sewed the base onto the lining - so I could turn the entire bag in the right way. Later I realised I could leave the base of the lining until the end.

With the bag in the right way, I top-stitched around the flap and the top.  To create the opening, unstitch the basting on both the outer and lining, then topstitch the outer to the lining. This is where I realised that after unstitching the basting and before the topstitching, I could sew in the base of the lining - because you can pull it out through the opening.

Last step is add a strap at the top. It's sewn onto one side, and buttoned on the other. The button allows you to use a shorter strap and still get over the car seat headrest.

Clear as mud? You can always try the Japanese instructions (which do have some very helpful diagrams).


I haven't attached the strap on this side yet. It is for hubby's car, and it's not here for me to check just how long it needs to be.

With the flap open, to show how easy it is to change boxes.

18 December 2013

Storing fabric

Every quilter loves fabric. Every sewer loves fabric. Not so sure as many love storing fabric. There's lots of theories as to the best way to store fabric. I don't think any of them are particularly wrong, just some work better for some people than others. For example, I know some people store lengths of fabric on pants' hangers. That just isn't going to work for me. Firstly, I have too much fabric, secondly, I have too little hanging space (actually, none), and thirdly, I can't even use these things for pants without making a mess. However, I know this would work for some people.
Image from: http://iheartorganizing.blogspot.com.au/2013/07/reader-space-working-wow-factor.html
You might think fabric is pretty easy to store - just fold it, and stack it in a drawer or shelf or box. Ah, nice theory. My fabric collection is not limited to quilting cotton; it includes an array of dressmaking fabrics. Have you ever tried to fold organza? Or tulle? How do you stack leather offcuts? And if you stack fabric, I can almost guarantee that the piece that you think you want, will be the piece on the bottom.

For the past eight years or so, most of my dressmaking fabric has lived in one of two places. A big plastic storage tub for folded lengths, and a variety of 'stash holds' for everything else. A stash hold is any place where you stash something to deal with it later.

The fabric in the big tub was stored vertically, and to find anything I had rifle through the whole lot, making a mess as I went.

I've slowly gained more fabric in stash holds than any where else. My major stash holds were two large tubs in an Ikea drawer system. I'm hoping to not need the drawers once the sewing space is complete, so I had to deal with stash hold. I thought it would take forever, but it's actually only taken about 24 hours (minus sleep, cooking, taxi driving for the Teen).

I dropped by our local "$2 shop" (ie the cheap bargain place). And I scored! They had small tubs, on wheels, with lids, for $4.50. They're about 11 x 14 inches, by 7 inches high. I decided these would be perfect for separating "speciality" fabrics - at the moment, organza, lace, stretch, fleece, and lining. This dealt with some of the harder fabrics to fold and stack. I may go back and a get a couple more. At the moment they're stacked under a desk, but they're small enough to go on shelves eventually.
This afternoon I pulled out my biggest tub of fabrics and I ran a burn test on each piece. If they were cotton and a quilting texture I separated them out. Anything that wasn't cotton, or was cotton but not suitable for quilting, has now been designated as "dressmaking".

The burn test is quite simple. You burn a snip of the fabric (with proper precautions - use tools to hold it over a fireproof vessel). If it is cotton it will smell like paper burning, the ash will be fine and powdery, and it will ignite when the flame gets close to it. If it is synthetic, it will smell like burning plastic (some bad fabrics smell when you iron them), it will melt near the flame, and the remnant will be a hard blob.

My smaller sized quilting fabrics are all already sorted, but a lot of lengths of cotton were mixed in with the big tubs. These I folded into 6.5 x 6.5 squares (near-ish). Simple process - folded them to a manageable size - no bigger than 1.5 x 1.5m, then wrapped it around my 6.5 inch wide ruler in one direction, removed the ruler and wrapped it the other way. Ideally, I'd like to store these fabrics in smaller tubs, hence the size. In the short term, they're stored in a drawer of the Ikea system.
Told you it was a small stash!

My dressmaking fabric - anything that isn't cotton - I folded the width of the drawers, and a little shorter than the height (to allow for the folding to add to height). Coincidentally, I found a 14 x 4.5 inch ruler in the tub, which was the perfect size for folding around.

I have two of these drawers, full of dressmaking lengths.
After folding the large pieces I was left with a tub of 'bits'. I'm still deciding what to do with those. Some of them are big enough to be useful; if not for clothes, then for things like pencil cases and bags. The best way to store them is a problem for another day.

The last task, and perhaps the most important, was to label everything. I found that labels help me store things correctly. It's not just that they help me remember what belongs somewhere, they also remind what doesn't belong somewhere. I'm far less likely to just 'stash' something if the label doesn't match what I'm stashing. If a label says "dress making scraps", I probably won't think, "Oh, I'll just put this length of fabric in there for the time being."
For anything that's plastic, I love my label maker. For the wire baskets and my storage tubs with handles, card on a string works well. I have corner punch, which rounds off the corners. It's a minor detail, but I think it makes the labels look nicer.

I have no idea what I do if I buy more fabric - I have no more space in the drawers. Mind you, I've got so much fabric in the drawers that should be used, I probably shouldn't be buying more fabric anyway.

If you've got a blog post on storing your fabric, or a favourite system, I'd love to hear about it.

11 December 2013

New sewing space (update)

We've been busy with life, and this weekend busy installing new front doors. Yep, doors, plural - two lovely big doors right in our lounge room. The room is unfinished - we have most of the internal walls, but not all; no skirtings or cornices or niceties; and only an undercoat of cheap ceiling white on the walls. But the doors are lovely and wonderful and beautiful; and the rest is livable. I will post photos, once the mess and debris is cleaned up!

With the new doors in, and, more importantly, the old door replaced with a wall, I could move into my new sewing space. It's taken nearly two full days. Yesterday I focused on organising the old sewing room into a library, sitting room, family storage room. My sewing stuff was moved into the new space and basically just "put".

Today I organised my stuff. It's not a final, but here are some progress photos.

This end used to be the front door. Eventually there will be a cutting bench, kitchen bench height, the full width of the room. Shelves will go behind it and to the right. The baskets will be sorted and no longer needed. They will be sorted! One day. As I no longer need to pack away my every day machine, the Horn cabinet now becomes an overlocker storage and embroiderer bench.

This end will be renovated some time next year and the weatherboards replaced with 'internal' walls. The area was originally part of a covered front porch. When the weatherboards are removed I will shelve the back wall as well. I've got a couple of tubs under the desk. Big one in the corner is for wadding, and I can't think of a way around that at the moment. The drawers hold FQ (I have a very small stash) and the tub on top is my "do next" project box.

I'm considering blinds for the window. The fabric bags hanging on the wall are the last two of my scraps to be sorted and cut. When they are done, I will reward myself with shelves for the rest of that section of wall. The machine on the left is my every day machine, a Pfaff Expression 4; the one on the right is my embroiderer, a Janome.

One of my goals is to get everything out of boxes and to create a "treasure trove" I want people to walk in and go, "wow". I'm also trying to recycle as much as possible. Shown here: ribbon stacks (tutorial planned, easy-as to create) with soft drink bottle dust covers; zippers and lace and ribbons stored in old food jars (post to come); bottoms of soft drink bottles creating useful catch-all containers.

Some of my scrap fabric collection. Fabric boxes contain pieces smaller than a FQ but bigger than 10x10 inches. Plastic tubs contain 2, 3.5 and 5 inch scraps. Currently none of this is sorted by colour.

One of my fabric boxes of large scraps. The boxes were originally very simple single layer 6" calico - four squares sewn in a loop, a fifth square sewn in to create a bottom. I've now added a layer of bag wadding, and re-used my scrap bags to create a liner and coloured edge on the outside.

Spinach leaf container from the local shops holds 3.5 and 2 inch squares.

Writing and drawing shelf. Each container contains a different type of pen - fabric markers, fabric decorating, normal textas, gel pens, fountain pens, and every day writing pens.
All my rulers hanging on the wall. I started this in my old space and I love it. So easy to grab what I want. This wall will eventually be right near the cutting table. The last little bit (on the far right of the photo) is still to be panelled.
My plan (hahaha) is add my posts as I go of specific ways I use to organise the space. It is both a small space and a large space. It is small in that is only a half room; it's large in that it is purely for my sewing and nothing else. I know I will have to be smart about how I choose to furnish it and how I organise my stuff. Hopefully, as I go I can share some of my ideas and help someone else.


15 November 2013

The asylum issue

I try very hard not to be ranty - here, on FB or in my communication with officials - but sometimes the soap box just has to be dusted off. There have been some incredibly shameful incidents in Australia in recent days; incidents sanctioned by government, incidents instigated by government policy. And I am disgusted.

Just a few from this week; JUST ONE WEEK:
Morrison: Offshore Camp Can Handle A Profoundly Disabled Child
Asylum seeker separated from her sick newborn in Brisbane
Job ads describe quandary of caring for unaccompanied children on Nauru

What I'd really like to do is slap a few politicians, teach them a few lessons about compassion and justice and being people focussed (things our daughter learnt before she was 10). In lieu of that, I've started doing something I've never done before - writing to politicians. Again, trying hard not to be a ranter, but that's difficult when I feel, firstly, outraged that this happening in my country, and secondly, so helpless to change anything. There's not a lot else I can do - sitting in middle class, comfortable Australia; enjoying my persecution-free, safe life with all its privileges.


When I read the article about the mother and baby yesterday, I sent an email to Scott Morrison, the guy in charge of the policies, the Minister for Immigration and "Border Control" (that should be 'sea border control', 'cause they don't care if you arrive by plane). (deep breath, deep breath). Today, with the disabled child and the unaccompanied children, I wrote again. I have to do something.

And today, not content with just sending an email to Mr Morrison, I thought I'd share my thoughts with the world, or that very small portion of it that reads my blog.

Email to Mr Morrison, Federal Minister for Immigration and [sea] Border Control

I am astounded. I am beyond dumbfounded. Quite frankly, I am gobsmacked that our politicians - one would presume incredibly smart and intelligent people since they're running the country - can be so woeful ignorant of the consequences of their policies. I'm dismayed that it's not just a Liberal or Labor problem. It appears to be rife throughout both major parties. Doesn't leave a lot of room for hope.
As leaders you, the politicians, 'set the tone'. The leader of any group or organisation sets the tone, determines the way forward, gives life to the vision that the people follow. Winston Churchill both represented and created the stoic British attitude during World War II. Similarly Hitler turned almost an entire nation, plus a few extras, into haters of the 'other'. A leader, for better or worse, sets the tone of the culture of the led.
And our current politicians appear to have no idea what future havoc they are breeding for themselves, for those that follow them into governance, or for the nation. Instead they have taken a narrow minded, short-term view - let's win an election, let's create fear, let's breed racism. And when the next Cronulla hits the news, you'll all stand back, wring hands, and say, "What is happening to our country." And no doubt, you'll all be out there stirring up more fear, more racism - creating a downward spiral of culture decay.
YOU set the tone, YOU determine the culture, YOU choose who or what to vilify and commend.
The government's current policy (and the previous governments' then policies) are creating a culture of fear, racism and xenophobia. No sooner had we started to undo the harm of the White Australia policy, the yellow peril and reds under the bed, than the government reintroduces the same fear, the same narrow mindedness. The 'enemy' may have changed; the attitude remains the same.
The policies of the past 15 years towards asylum seekers (NOT illegal - such an illiterate position) are sickening. They have created and will continue create a nation that is self-absorbed, self-seeking, cruel, and, quite frankly, ugly. These are people who have been through trauma that few, if any, of us can imagine. And instead of offering hope, compassion and justice, we heap more hurt, more indignity, more ugliness into their lives. And in doing so we remove the hope, compassion and justice from our own national culture. The danger to Australia's way of life is not those that come to us from overseas; the danger is the enemy within.
This is not a time to be proud to be Australian. Forget the ugly American. We are fast becoming the ugly Australians.
And the only ones who can change that are you - the politicians, all of you, any of you. Stand up for what is right, as a human being. Otherwise, move over McCarthy, Australia offers you, Morrison. Cruel, cold-hearted, unfeeling, more interested in party politics than people.
Sad. Very sad.

13 November 2013

Sewing room - Aladdin's Cave (in progress)

I've jumped the gun, according to The Mr, and partially moved into my new sewing space (Sewing Room Inspiration). I can't fully move in, because it still needs to act as a front entrance. I am moved in enough to be kicking myself for not realising years ago how big the area was.

For the past 10 years my sewing room has primarily been just that - a sewing room, but I have also had to keep an awareness of it needing to covert to a guest bedroom. And the most recent incarnation was supposed to also be available as a sitting room.

The room has a full wall of 50cm deep shelves. Perhaps that doesn't sound very deep, but a standard bookcase is 30cm, and paperbacks will easily fit on a 15cm deep shelf. Deep shelves mean you can't have lots of little things; the stuff at the back gets lost, knocked over, and generally isn't easy to use. I found the easiest way to organise my stuff and keep the multi-purpose space tidy was to keep everything in boxes.

I went to the cheap shop and bought the biggest gift boxes they had. From the stationery shop I bought sticky business card holders (I think they're designed to go the front of conference folders to take name labels). I like the plastic slips because it's easy to change the label without it becoming messy. I also kept shoeboxes; some got covered, some just got used.

I piled like-stuff into a box and labelled it. Some boxes I filled with zip lock bags of stuff. My 'sewing stuff' box had bags of zips, ribbons, lace, etc.


This is not a bad way organise a space. It has worked for me for a number a years. The biggest hassle I had was that I didn't have a 'shelf per box', so boxes were stacked. Sometimes a heavy box ended up on top, which made getting lower boxes out a little tricky.

In my new space; however, I do not want big boxes filled with 'stuff'. I want lots of little containers, in single rows on shelves. I already have a set of 15cm deep shelves on one wall, and I will definitely be adding more to the space. Obviously, not everything can be stored on a narrow shelf, but lots of stuff can. My plan is to gradually post how I'm storing various 'stuffs'. As I'm trying to keep costs to a minimum, there's lots of imaginative recycling and reusing happening.

08 November 2013

Drastic measures

A friend posted a rather innocuous comment yesterday about feeling at odds because there was nothing on TV, nothing happening on Facebook, and just generally feeling dissatisfied because she wasn't 'connected'. I started to think about my level of 'connection'. This morning I decided my Facebook addiction (and that is what it has become) has to come to an end.

I didn't consider complete cold turkey; I do enjoy the interaction and keeping up to date with friends and family. Heck, if I didn't post on Facebook my mum wouldn't know what I was doing in life. But I did decide that checking in every time I walked past the computer or sat down had to stop.

Taking into account my disastrous attempts to give up coffee, late nights and chocolate, I realised I would need some 'assistance' to limit my access. I have added Leechblock (https://addons.mozilla.org/en-US/firefox/addon/leechblock/) to Firefox. Leechblock allows you to specify sites and add 'rules' for access; either a time limit (e.g. 1 hour) or time range (e.g. 9:00am to 9:15am). You can also set rules for what happens when you try to access the blocked site outside the rules and you can hide or block the app so you can't change the rules while they're running (that is, if the rule says only one hour, once your hour is up you can't just open the app and change it).

I haven't been too onerous. I have blocked Facebook for six hours on weekdays - 9 til 12 and 1 til 4. I haven't hidden the app or blocked it. And I've only installed it on one computer; I could still use my laptop or phone. However, I figure if I can't limit my access this way then I really do need help - professional sort of help.

Today has been quite productive. I've got things done that have needed doing for some time. I have struggled to not want to just sit and gab all morning. The three hour afternoon session seems to be a little easier.

As I've set this up on the main computer, there may be others who try to use Facebook during my blocked sessions (I couldn't find a way to block just my access). I've set up a page here on my blog (http://suebk.blogspot.com.au/p/facebook-not-available.html) that Leechblock will redirect to, if anyone tries to access Facebook in the blocked out times. If you open the page - don't worry, your Facebook account has not been blocked.

29 October 2013

New sewing space - organising bits and bobs

A quick one. I have a new sewing space. Well, I have half a new sewing space. My previous sewing space needed to pack away to become a guest bedroom. I found keeping everything in zip lock bags inside big gift boxes worked well. Each box was labelled - sewing, art, stamping, etc. In my new space I don't have to pack everything away all the time, so I'm taking some time to think about how to organise everything. A lot of the ideas I've got are either stolen from online or based purely on what's on hand that works. This one was stolen.

Hot glue a magnet to the base of small container with a lid - these are 35ml (1.2 oz)

Screw an IKEA strip to the wall, or use a magnetic whiteboard, or a metal sheet, possibly even magnetic paint (but I'm not sure how strong that is).

Fill containers will all those little bits and bobs that lie around the sewing room - press studs, hooks & eyes, thimbles.
If you used a larger sheet, perhaps slightly larger containers, this would work for buttons, beads, and notions that are small and annoying to store. I'm thinking I may eventually move all my beading notions to this system. At the moment they are in trays, but the straight sides make it difficult to get them out.

15 January 2014: Update
Although great in principle, this idea is simply not working. Originally, I used a hot glue gun to attach my magnets to the bottom of my containers. A number of them fell off. In researching, I've found that the heat of the hot glue can also demagnetise the magnet.

I tried double sided tape, a good strong one, but it doesn't stick to the plastic containers reliably. I'm forever giving containers a 'push' to reattach the tape.

I tried PVC glue - again, it doesn't stick to the plastic.

I'm thinking of ditching the magnet idea and using sticky velcro dots. If the velcro stays stuck to the plastic containers, this would have the added advantage of being able to stick a matching dot anywhere on the walls in the sewing room.

This is a good site for info about sticking magnets to various materials: http://aussiemagnets.com.au/knowledgemanager/questions.php?questionid=17

Creativity Journal - Day 23 (Recycle)


Already a day behind on my new plan to post every day and I haven't even started! Oh well. Life is what it is.

According to the dates on the photos, I completed this challenge at the beginning of September. It's now almost the beginning of October. I have been creative in between, just not as disciplined or structured as I would like. I believe creativity begets creativity; that is, the more creative you are, the more creative you become. Instead of waiting for inspiration to strike, one must be activity seeking after it.

For this challenge I yet again abandoned my word and sewing themes. Although, there is a tenuous sewing connection.

I took a soft-drink bottle (soda/pop if you must) from the recycle box and cut the bottom off.
The edges are quite sharp, so I poked holes at even intervals around the top edge of the bottom. I blanket stitched with some scrap wool, and then wove more wool into the stitching. This creates a handy 'tub' for my desk.
The top half I cut into a spiral. To ensure an even spiral I marked the bottle in quarters. On one 'side', from the cut edge to the lid, mark every inch; turn the bottle a quarter and mark every 3/4 inch mark; turn another quarter and mark every 1/2 inch mark; turn the final quarter and mark every 1/4 inch mark. Starting at the side with the one inch marks, cut from the bottom edge to the first 1/4 inch mark, through to the first 1/2 inch mark, and then the first 3/4 inch mark. Continue cutting until you reach near the top.

The first bottle I cut was left undecorated:
The second one I decorated with Sharpies:
Their purpose? Don't really have one. I have them hanging in the garden at the moment. They just create movement and small flashes of light when the sun hit them.

I have continued to experiment with using soft drink bottles for containers though. They're free (if you're drinking the contents anyway), disposable if you find something better later, and really, really useful.

Bottom of a bigger bottle, not yet edged. It's a great size for chucking pins at while I'm sewing.


In this tray (a brand new, never-been-used, kitty litter tray, because it was the perfect size for my desk):
  • the bottom of a 2l milk bottle, 
  • a larger (1.25l) bottle cut in half for my scissors and rotary cutters
  • a smaller (1l) bottle cut in half for my rulers.

I have found that cutting through the centre of the bottom is really hard. For the smaller bottle, with the rulers, I didn't bother.

I have also seen pictures of bottles with just a piece cut out of one side. These are used standing up for pencils and the like.


27 October 2013

Catching Up

Oh, dear. Last entry "29 August". Sigh. I'm just not very good at this constant routine stuff. Strange really, because my personality type is supposed to like boring routine, no surprises, no spontaneous anything. And yet, I suck at it really badly. I guess it's just one of those examples of the contradictoryness (my word) that makes humans so interesting.

Anyway, I have been being creative. I have also been very busy. But I will post more regularly again. I have some creative diary entries to catchup on, a finished quilt top to show off, and the beginnings of my new sewing room space to put up, including some recycled storage ideas. Starting tomorrow.

I'm only posting this because it's on my to-do list and I really want to tick it off, but I want to go to bed, and I don't want to rush a post and fill it with even more typos than usual :-) As an editor I'm starting to become a little paranoid about my typos.

29 August 2013

Creativity Journal - Day 22 (Bridge)

Create a bridge. Connect two things in a creative way. It could be small enough for an amoeba or big enough for an elephant to cross it.
I would really like to claim my new sewing room design as my bridge project. After all, if it happens it will create one of the most difficult and powerful bridges there is - bridging the difference of opinion of two people.

28 August 2013

Sewing room inspiration


When I first started sewing we lived in a very small cottage. We had a kitchen, bathroom, lounge room, two bedrooms and long, narrow enclosed sleep-out. The lack of dining room was annoying and the sleep-out wasn’t user friendly. It was boiling hot in summer as the afternoon sun sat on the windows for hours, and cold in winter because the sun was behind the neighbour’s house. Eventually we rigged up some temporary blinds made from shade-cloth. They rolled down in summer and rolled away under the eaves in winter. We started using the space as a lounge room, which gave us the lounge room as a dining room. When I started sewing I took the far end of the room and set up my little ‘nook’.

Although this house is bigger, we now have a teenager and my sewing has grown at an even faster rate than she has. I currently have most of the third bedroom, which is open to the lounge and is supposed to be a cosy sitting room, come guest room, come sometimes study, come sewing room. The reality is that a 3m x 3m room simply won’t function in three or four different ways, at least not with stock standard furnishings.

I’ve been looking at space saving options – Murphy beds, roll away desks, and the like. Most of them are extremely expensive and still a lot bigger than our room will handle. I love looking at websites that proclaim “for small areas” and then show you rooms with a double bed and two metres of clearance around all four sides. Wouldn’t that be nice, if that were my ‘small’ space?

We’ve recently added a verandah to the front of our house. The plan (currently waiting on a job and a pay packet) is to put a new double glass door from the lounge room onto the deck. The current front door opens into a small entrance foyer. We’ve used this area as a library for a while and the plan was to remove the current door and shelve the entire space. There is a large (double-door) opening into the lounge room on one side, which we could partially close up when it’s no longer the main entrance, and an external window on the opposite wall.

The space looks a little like:

Yesterday I looked again at the space. It is almost exactly half the size of the spare bedroom. It measures 3.40m long by 1.40m wide (the bedroom is just under 3m wide). My sewing space needs three things – of which I currently have one. It needs a large cutting and layout bench at kitchen cabinet height, a working bench that will take three machine (yes, I’m greedy, I regularly use an overlocker, embroidery machine and sewing machine), and lots of storage.

And I actually think that with a bit of planning and custom building, I can get all three elements into the front entrance.

Here’s the plan:

At one end build in a cutting bench, the full width of the room (1.4m) by the depth of the wall on the lounge room side (0.8m). This is about 0.95m high.

Build a ‘U’ shaped bench at 0.73m high that runs under the cutting bench, along the outside wall and along the wall at the other end. This bench is 0.50m deep. This bench will hold sewing machines and provide general working areas. Under the cutting bench it will provide storage space for rulers and mats and the like. Originally I thought to keep it as 0.50m deep under the cutting bench, but now I’m thinking the full 0.80m will work fine for those sorts of tools.

Under the bench, there will be a shelf all the way around, about 10cm deep. Again this will provide storage for things such as scissors, unpickers, spare needles, and all those things you need when you’re actually sewing. At the end opposite the cutting bench it would hold all the tools for the stuff I do that’s not sewing – beading and jewellery making, paper craft and so forth. Ideally, this would be drawers all the way along, but I think a shelf with suitably labelled storage baskets will work just fine.

Above the working bench and the cutting bench would be various depth and height shelves to fit the space. Under the benches I’ve planned some shelves under the cutting bench, towards the back where I won’t kick it with my feet; possibly in the corners of the working bench; and a narrow ledge to pick up sewing machine feet for cleaning the floor and so forth.

I’ve drawn up some plans and I had a play with a room-drawing program last night. It will be a small space – not a lot of empty floor space. But, if I spend some time now planning what sort of storage I will need – do I need lots of wide shelves, will narrow shelves actually be better, what about baskets etc – I think it will be a lot more efficient than the entire room I have at the moment.

The only thing I’ll really lose is wall space for designing and hanging things. I am thinking that perhaps a framed board that can sit in front of a set of shelves and lifted out of the way as need be might work for designing.

I am very excited by the possibilities and the thought of having my own space that I don’t have to share with anyone. And ending the endless arguments and discussions about my taking over the entire house.

I’ve been playing in RoomSketcher (http://www.roomsketcher.com/). I like it. It’s easy to use, it’s flexible, it gives you a good idea of what a room might look like. You can only design in 2D in the free version; this makes actually filling a room with stuff (boxes, books, knick-knacks) a little tricky. In the paid version you can use 3D, which I imagine is a lot easier. There’s a limited amount of furniture (no sewing machines), but all the furniture can be customised – changing the dimensions and where in space it sits. To indicate my bench with the under shelf, I’ve ‘stacked’ two tables on top of each other. One is 630mm high, the other is 730mm. Although you can’t design in 3D in the freebie version, you can view your room in “Home 360”, which will give you a 3D fly around.

Here are a bunch of screen shots of my design. As I said, RoomSketcher has limited furniture. I would not be using a dark heavy wood for the shelving. I'm thinking white melamine for easy cleaning and to keep it light. And there's no 'sewing machine' on the list either. I've substituted speaker boxes, which look nothing like a sewing machine but do take up a space.

Standing in the entrance to the lounge room, looking left

Standing in the entrance to the lounge room, looking straight ahead

Standing in the entrance to the lounge room, looking right

Take from the left-hand end of the space (the blue is the lounge room)

Take from the right-hand end of the space (the blue is the lounge room)

Taken from the window, looking right

Taken from the window, looking straight ahead (into the lounge room)

Taken from the window, looking left

25 August 2013

Owl - Day 1

I started my garden sculpture this afternoon. And so far I'm quite pleased with the results. It's both not quite as difficult as I expected and harder than I thought. Although the material (Hebel) is soft and doesn't take a lot of strength to work with, it is still very tiring to tap away with a hammer and chisel for two hours. It would be nice to be ambidextrous. I've taken it slowly, slowly because I don't want to chip off a huge piece in the wrong place and wreck it.

For my first ever sculpture - I'm thinking I'm doing okay.
My box of tools - the cheapest set of chisels (and it would have been easy to spend $100+) and files that I could find, my clay proforma, sandpaper, and a pencil.

A blank block

Marked up block and clay proforma. I realised later that I forgot the ridge between the eyes :-(

Feet, first pass. I've since made them a little deeper and a little wider.

Finished first side. The wings were originally the same density as the feet, but they look much better deeper and wider.

I'm not entirely happy with the eyes. Need to do some more fine work to even them out.

Here he is standing. The pencilled in wing on the side is obviously a little out of whack now I've actually carved the front.

And one just for a perspective of his true size. Eyes look really screwy because of the light coming in from the right.

21 August 2013

Creativity Journal - Day 21 (Story)

Write a ten-word love story. Bonus: Illustrate it!
Woohoo. Three weeks complete. And it's only taken me seven to get here. Today's was fairly easy. Ten words isn't a lot but if you add illustration you can say just about anything. My first thoughts were of the opening few minutes of the film "Up" - no words, lots of love story. And my next thought was a video that several people have posted on FB over the past few days. And so I offer these ten words:


She was beautiful, loyal, and smart, and loved him completely.


20 August 2013

Creativity Journal - Day 20 (Clay)

Buy or make some clay (see instructions on page 238) and then use it like you never have before.
What's this? Two posts in one day? The boats have been sitting around for a couple of days and I've been mulling over the clay adventure. My thoughts went:

- "Use it like you never have before" - that's the easy bit. I haven't used clay since high school, so really anything would count as a new experience.
- Clay and fabric don't really mix. I could make some sort of patchwork pattern on clay. But what would I use it for? That becomes clutter.
- Clay and words might work. But again, what would I use it for? More clutter.
- What I really want is some sculptures in the garden. Hmmm, where does one get that much clay? Maybe I could change the rules and work with something other than clay.
- Let's see ... plaster doesn't last in the weather.
- Concrete? Need a mould. Hmm, too difficult.
- Ah, hebel. Hebel is a lightweight aerated concrete sold in blocks or panels. For some reason I remember someone telling me about it years ago.

So, the plan became research hebel, buy hebel, carve hebel. I've never carved anything other than the occasional roast dinner, so it could be an interesting adventure. I started, where everyone starts all projects these days, my friend, Google. There are some beautiful hebel sculptures. There are some weird ones too, but lots of a lovely stuff I wouldn't mind having in my garden.

Bunnings, which sells the stuff, even tells you how to make sculptures with it.


I 'pinned' a few I thought were doable. I quickly realised that intricate, interwoven abstracts probably weren't a good place for a complete novice to start. This swan really appealed, but I think even this would be stretching it for a first attempt. I could just see me managing to snap the neck in two.


As I thought about 'releasing the angel inside' (apparently a quote by Michelangelo) I got a bit bug-eyed about the whole enterprise. Although hebel is quite cheap as a sculpture material ($10 for a 600x200x200mm block), I didn't want to end up with a huge block of masonry that like a pile a rubble (or was a pile of rubble). Although, if my pile looked like this ...

I did see a number of owls I liked (they're mainly the ones I ended up pinning). Owls are quite trendy at the moment, but I've always loved owls (and frogmouths). A couple of sculptures that I pinned were very stylised and I realised I could keep it quite simple and still create an impression of an owl.  

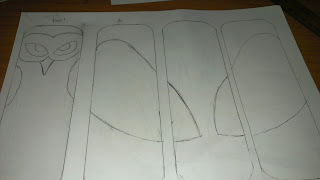
I started sketching. I don't do 3D very well. I get tangled in the corners and the angles. I've tried to work out Google Sketch Up, but it just frustrates me. I started back at the beginning of high school tech drawing - a flat image of each side.

I decided to keep the hebel essentially rectangular, with some rounding off on the edges so I could use it as a bird bath stand. The wings and beak will be etched into the stone. The eye saucers will be etched in with the eyes either left raised, or if I stuff it up, painted in, or glow in the dark stones :-)

You may notice from my tenses, that I haven't actually carved this yet. No, because again the 'completely don't know what I'm doing' struck. And here's the irony of this challenge. I decided not to use clay. I decided to sculpt something out of hebel. I decided I need to make a model of my intended sculpture and clay is to most logical choice of material. So, in the end, I did use clay. (No idea what I'm going to do with my owl, but I'm sure he won't be clutter.)

Front view
Side view
Rear view
Size
Having now made my prototype, I will go ahead and buy a hebel block to play with. Still might end up a pile of rubble, but at least now I know what sort of look I'm aiming for and that it does actually work in 3D. Hebel will have one slight advantage. I can mark it up with a pencil, instead of working 'freehand'.